White Moon
This tutorial is my own creation and any resemblance to any other tutorial, is purely coincidental.
Please do not copy as use as your own work
This tutorial is written using PSP 9 but it can also be done in other versions
Animation Shop this I will ref to as AS
Filter's used
MuRa's Copies
Alien Skin Xenofex 2
Animation of choice
Tube of choice- I using Molly Harrison you can buy her work at CDO here http://cdoestore.com/
Drop Shadow I used was H & V 3 Opacity 50 Blur 5
Font of choice I used Halloween Bats, I found I had to duplicate this as it was not bold enough
Remember to save often
Lets begin
Step 1.
Open a image 600 x 400 fill with a light colour from your tube, or white,
new raster layer fill with a gradient made with two colours from your tube,
redial Angle 0 Repeat 1, apply MuRa's Copies
Wallpaper rotate default settings, Adjust Blur 10, duplicate,
keep this layer active apply Eye Candy 5 Nature shot 1,
apply soft light and lower the opacity down to 80 merge visible. Lower this down to 50
Shot 1
Step 2
Copy and paste your tube and place on the right hand side,
give it a drop shadow, repeat drop shadow but do -3 on H & V,
I put a few bats on, mine was in my perset tool that came with PSP,
see my tag for ref: call this layer Bat
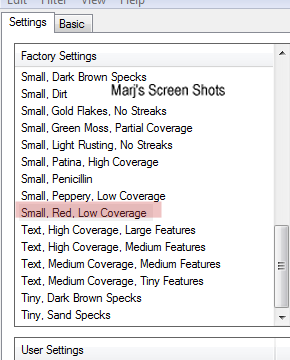
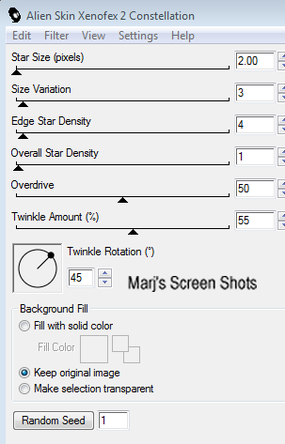
apply Alien Skin Constellation, using the small star constellation setting, shot 2.
Shot 2
Copy and paste your tube and place on the right hand side,
give it a drop shadow, repeat drop shadow but do -3 on H & V,
I put a few bats on, mine was in my perset tool that came with PSP,
see my tag for ref: call this layer Bat
apply Alien Skin Constellation, using the small star constellation setting, shot 2.
Shot 2
Step 3
New raster layer fill with your gradient select all modify contact by 6 hit delete select none
and use same drop shadow as before, name this border
Add your copyright and name
Shift D this is for your AV
If you do not wish to animate save your tag, at this point
Step 4
Open up AS find the animation you are going to use,
Back to PSP close off your name, copyright and border, copy merged and take to AS
Paste as new animation and make as many frames as your animation had mine had 10 frames,
and was of falling leaves, edit select all, propagate paste repeat with your animation and take it and paste in where you want on your tag, as it did not look enough leaves on my tag I repeated this action,
edit select all and set frame properties at 30.
Step 5
Back to PSP and open up your name copyright and border, and close the rest off,
Copy merged and take to AS and repeat step 4
Step 6
Back to PSP crop the image you put to one side by 150 x 150,
Remember if you use any part of your tube to add your copyright info.
If you are going to animate your AV repeat steps 4 and 5
Hope you enjoyed my tutorial any questions you may email me at [email protected]
Marj
Written 21st September
