New Year 2014


This tutorial is my own creation and any resemblance to any other tutorial,
is purely coincidental.
Please do not copy and use as your own work if you wish to translate please email me
It’s assumed that you have working knowledge on how to use filters/plugins.
This tutorial is written using PSP 9 but it can also be done in other versions
Animation Shop I will ref: to this as AS
Animation of choice, a firework one would be best,
sorry can not share but there are loads out there
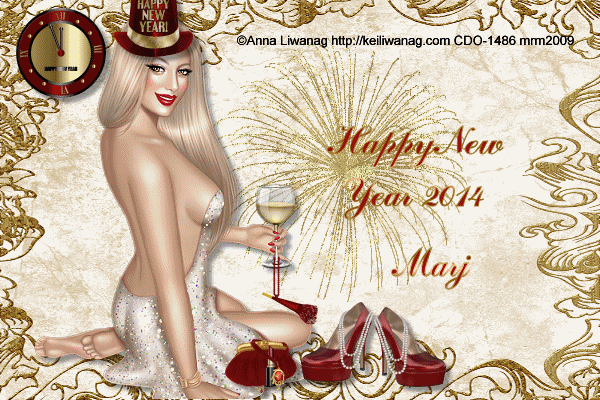
Tube of choice- I used I used Anna Liwanag you can get her work here http://www.cdoestore.com/#
Drop Shadow I used was H & V 4 Opacity 40 Blur 5
Font of choice I used Art Script
Embellishments of choice I used a kit by Lacarolita's Designz here
http://lacarolitasdesignz.blogspot.com/
and a paper I had on my computer sorry can not share
Lets begin
Remember to save often
Step 1.
Open up the paper you are going to use, image 600 x 400
elect all copy and paste the paper you are using and paste into section,
name this background.
Step 2
Copy and paste your tube re-size if necessary, Adjust, Sharpen,
and give it a drop shadow, position it where you like
I put mine on the left hand side.
Step 3
Now add your embellishments, I used the Clock, Purse, Hat, Noise Maker,
and Shoe, which I duplicated and mirrored so it looked like a pair of shoes,
you will need to re-size them all which I did by 10%,
add Happy New Year 2014, your name and copyright
Shift D twice these are for your forum and your AV, put these image's to one side
Step 4
Open up AS and find the animation you are going to use,
close off all your layers apart from your background,
copy and take over to AS and paste as a new image,
make the same number of frames as your animation,
the one I used had four then Edit Select All, Propagate,
do the same with your animation and paste this into your new image,
back to PSP close the background layer open rest up and copy merged,
and take to AS make four frames and Edit Select All, Propagate,
when happy save as a GIF.
Step 5
Back to PSP open up one of the image's you put to one side,
as my paper had a border on it, I made a new image 600 X 300, select all copy,
and copied the back ground and pasted into section,
name this background, back to the first image,
then copied and pasted all the other layers on to it.
and arranged them on the new image
Repeat step 4
Step 6
Open up the other image you put to one side, and crop this by150 X 150,
using the part of image you want, repeat step 3,
add your name and copyright
PLEASE remember if you use any part of your tube to add your copywrite
Hope you enjoy my tutorial, and problems please feel free to email me at [email protected] please remember this is just a guide, I would love to see any work you have made using my tutorials
And with your permission show them on my site
Marj
Written 2nd December
is purely coincidental.
Please do not copy and use as your own work if you wish to translate please email me
It’s assumed that you have working knowledge on how to use filters/plugins.
This tutorial is written using PSP 9 but it can also be done in other versions
Animation Shop I will ref: to this as AS
Animation of choice, a firework one would be best,
sorry can not share but there are loads out there
Tube of choice- I used I used Anna Liwanag you can get her work here http://www.cdoestore.com/#
Drop Shadow I used was H & V 4 Opacity 40 Blur 5
Font of choice I used Art Script
Embellishments of choice I used a kit by Lacarolita's Designz here
http://lacarolitasdesignz.blogspot.com/
and a paper I had on my computer sorry can not share
Lets begin
Remember to save often
Step 1.
Open up the paper you are going to use, image 600 x 400
elect all copy and paste the paper you are using and paste into section,
name this background.
Step 2
Copy and paste your tube re-size if necessary, Adjust, Sharpen,
and give it a drop shadow, position it where you like
I put mine on the left hand side.
Step 3
Now add your embellishments, I used the Clock, Purse, Hat, Noise Maker,
and Shoe, which I duplicated and mirrored so it looked like a pair of shoes,
you will need to re-size them all which I did by 10%,
add Happy New Year 2014, your name and copyright
Shift D twice these are for your forum and your AV, put these image's to one side
Step 4
Open up AS and find the animation you are going to use,
close off all your layers apart from your background,
copy and take over to AS and paste as a new image,
make the same number of frames as your animation,
the one I used had four then Edit Select All, Propagate,
do the same with your animation and paste this into your new image,
back to PSP close the background layer open rest up and copy merged,
and take to AS make four frames and Edit Select All, Propagate,
when happy save as a GIF.
Step 5
Back to PSP open up one of the image's you put to one side,
as my paper had a border on it, I made a new image 600 X 300, select all copy,
and copied the back ground and pasted into section,
name this background, back to the first image,
then copied and pasted all the other layers on to it.
and arranged them on the new image
Repeat step 4
Step 6
Open up the other image you put to one side, and crop this by150 X 150,
using the part of image you want, repeat step 3,
add your name and copyright
PLEASE remember if you use any part of your tube to add your copywrite
Hope you enjoy my tutorial, and problems please feel free to email me at [email protected] please remember this is just a guide, I would love to see any work you have made using my tutorials
And with your permission show them on my site
Marj
Written 2nd December
