Grace

This tutorial is my own creation and any resemblance to any other tutorial, is purely coincidental.
Please do not copy as use as your own work
This tutorial is written using PSP 9 but it can also be done in other versions
Animation Shop
Filter Flaming Pear Flood
Filter Eye Candy Gradient Glow
Animation of choice I used one by Missy, called Breakaway here http://divineintentionz.blogspot.com
Tube of choice- I using the great work of Barbara Jensen, do not use unless you have a license
This can be purchased at her site here http://www.barbarajensentubes.com/
A element, the one I used I have was by Rainbow Coffi
You get get this and many others here http://psp-playground.com/
Any word art again I used some I had, use some that fits in with your tube
Drop Shadow I used was H & V 3 Opacity 50 Blur 5
Font of choice
Lets begin
Remember to save often
Background #840105, if you use same tube as me
Step 1.
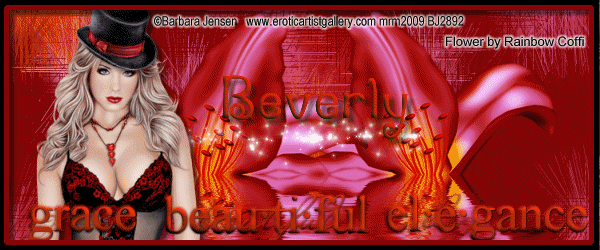
Open a image 600 x 400 fill with your background colour,
Copy and paste your element, and colourise duplicate,
move this over to the right hand side see my image for ref,
duplicate and mirror, merge down,active your original, resize 130 %,
Effects Image Effects Seamless Tiling, default settings merge down,
Effects Texture Fur settings Blur 43 Density 40 Length Transparency 100,
As you can see this gives you a nice background, name this background.
Step 2.
If your tube looks to transparent, duplicate and merge down,
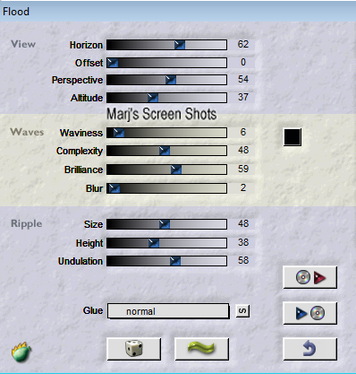
Apply Flaming Pear Flood, shot 1, merge visible.
Shot 1
Please do not copy as use as your own work
This tutorial is written using PSP 9 but it can also be done in other versions
Animation Shop
Filter Flaming Pear Flood
Filter Eye Candy Gradient Glow
Animation of choice I used one by Missy, called Breakaway here http://divineintentionz.blogspot.com
Tube of choice- I using the great work of Barbara Jensen, do not use unless you have a license
This can be purchased at her site here http://www.barbarajensentubes.com/
A element, the one I used I have was by Rainbow Coffi
You get get this and many others here http://psp-playground.com/
Any word art again I used some I had, use some that fits in with your tube
Drop Shadow I used was H & V 3 Opacity 50 Blur 5
Font of choice
Lets begin
Remember to save often
Background #840105, if you use same tube as me
Step 1.
Open a image 600 x 400 fill with your background colour,
Copy and paste your element, and colourise duplicate,
move this over to the right hand side see my image for ref,
duplicate and mirror, merge down,active your original, resize 130 %,
Effects Image Effects Seamless Tiling, default settings merge down,
Effects Texture Fur settings Blur 43 Density 40 Length Transparency 100,
As you can see this gives you a nice background, name this background.
Step 2.
If your tube looks to transparent, duplicate and merge down,
Apply Flaming Pear Flood, shot 1, merge visible.
Shot 1
Step 3
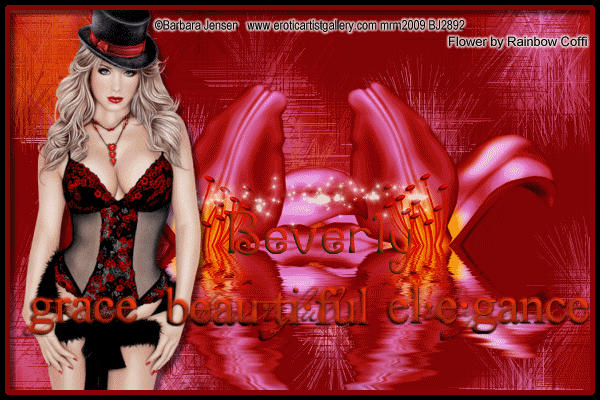
Copy and paste your tube as new layer, position it on the left hand side,
resize if necessary, give it a Drop shadow,
Do shift D twice for your forum tag and AV, and put these images to one side
Add your copyright name and a saying or word art,
I gave my copyright a gradient glow Width 3, Soft corners 25 and Opacity 100, thin White
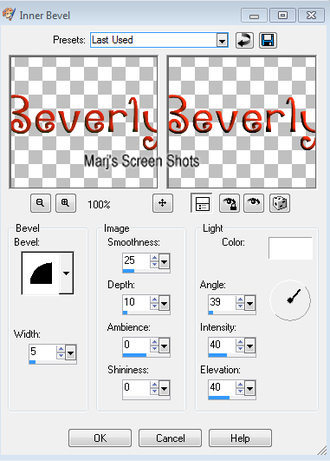
While with the word art and name I did a inner bevel shot 2, and a drop shadow
Shot 2
Copy and paste your tube as new layer, position it on the left hand side,
resize if necessary, give it a Drop shadow,
Do shift D twice for your forum tag and AV, and put these images to one side
Add your copyright name and a saying or word art,
I gave my copyright a gradient glow Width 3, Soft corners 25 and Opacity 100, thin White
While with the word art and name I did a inner bevel shot 2, and a drop shadow
Shot 2
Step 4
New raster layer fill will your background colour,
select all modify contact by 10 keep selected expand by 5 invert,
and fill with black select none, give this a drop shadow, if you do not wish to animate save now
Step 5
Open up AS find the animation you are going to use,
Back to PSP copy your background layer and take to AS, paste as new animation,
Edit Duplicate Selected and make as many frames as the animation has,
Mine had 12, still on this image, Edit Select all, propagate paste,
Do the same with your animation and place it where you think it looks best.
Step 6
Back to PSP close background layer off and cope merge and take to AS,
Make the number of frames you need and repeat step 5, when happy save
Step 7
Back to PSP open up one of the images you set to one side,
and crop it by 150 x150, repeat 4 but contact by 8 and expand by 4,
Please remember if you use any part of your tube to add your copyright.
Step 8
Still in PSP open up other image you set to one side,
move anything around you need to,
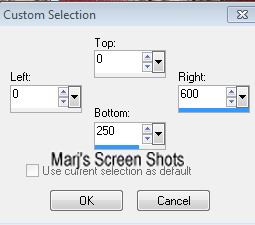
Then take your section tool and make a selection see shot 3,
Image crop to section. Repeat steps 4 to 6,
Shot 3
New raster layer fill will your background colour,
select all modify contact by 10 keep selected expand by 5 invert,
and fill with black select none, give this a drop shadow, if you do not wish to animate save now
Step 5
Open up AS find the animation you are going to use,
Back to PSP copy your background layer and take to AS, paste as new animation,
Edit Duplicate Selected and make as many frames as the animation has,
Mine had 12, still on this image, Edit Select all, propagate paste,
Do the same with your animation and place it where you think it looks best.
Step 6
Back to PSP close background layer off and cope merge and take to AS,
Make the number of frames you need and repeat step 5, when happy save
Step 7
Back to PSP open up one of the images you set to one side,
and crop it by 150 x150, repeat 4 but contact by 8 and expand by 4,
Please remember if you use any part of your tube to add your copyright.
Step 8
Still in PSP open up other image you set to one side,
move anything around you need to,
Then take your section tool and make a selection see shot 3,
Image crop to section. Repeat steps 4 to 6,
Shot 3
There done, hope you enjoyed this Tutorial.
Any questions you can email me at pompy9642@msn.com
Marj
Written 26th September 2012
