My your dreams come true

My template HERE
This tutorial is my own creation and any resemblance to any other tutorial, is purely coincidental.
Please do not copy and use as your own work.
If you wish to translate please email me
It’s assumed that you have working knowledge on how to use filters/plugins.
This tutorial is written using P.S.P. 16 but it can also be done in other versions
Animation Shop I will Ref to this as AS
Filter Unlimited 2
Tube of choice- I used Jamie Kidd you need one that has a close up, I brought mine when she was at CLIM.
Her work is now available at CDO here http://cdoestore.com/
Font of choice I used Calilbri
Please remember to Adjust and Sharpen your Tube if you resize
Remember to save often
Press Shift D to duplicate the template, and close the original, delete the copyright info
Step 1
Activate the back ground layer, you can leave the colour as it is,
or colourise it to match your tube.
I left it as it was.
Step 2
Active your Heart and Block outline.
Take your magic wand and hold the shift key down click inside the six blocks.
New raster layer and fill with a colour from your tube I used #740007.
But leave this up to you.
Now give your Heart and Block outline, a drop shadow.
Step 3
Activate your Heart and Block layer, take your magic wand and click inside it new raster layer.
And fill with a gradient of choice copy your close up and paste in the big heart,.
Take your eraser tool and take away the tube that over laps the big heart, you just want her face in the heart.
Lower the opacity down to 75
Step 4
Copy and paste your tube, give it a drop shadow and position it in middle of image.
Add your artists copyright and your name give your name a drop shadow
Step 5
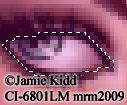
We want her eyes to blink, so what we do is
Active the tube layer in the heart, and take your free hand section tool click on point to point,
and very very carefully, make a section of her eyes.
New layer and fill with black, select none see shot 1 for how it should look.
Name this eyes, close this layer for now.
Shot 1
This tutorial is my own creation and any resemblance to any other tutorial, is purely coincidental.
Please do not copy and use as your own work.
If you wish to translate please email me
It’s assumed that you have working knowledge on how to use filters/plugins.
This tutorial is written using P.S.P. 16 but it can also be done in other versions
Animation Shop I will Ref to this as AS
Filter Unlimited 2
Tube of choice- I used Jamie Kidd you need one that has a close up, I brought mine when she was at CLIM.
Her work is now available at CDO here http://cdoestore.com/
Font of choice I used Calilbri
Please remember to Adjust and Sharpen your Tube if you resize
Remember to save often
Press Shift D to duplicate the template, and close the original, delete the copyright info
Step 1
Activate the back ground layer, you can leave the colour as it is,
or colourise it to match your tube.
I left it as it was.
Step 2
Active your Heart and Block outline.
Take your magic wand and hold the shift key down click inside the six blocks.
New raster layer and fill with a colour from your tube I used #740007.
But leave this up to you.
Now give your Heart and Block outline, a drop shadow.
Step 3
Activate your Heart and Block layer, take your magic wand and click inside it new raster layer.
And fill with a gradient of choice copy your close up and paste in the big heart,.
Take your eraser tool and take away the tube that over laps the big heart, you just want her face in the heart.
Lower the opacity down to 75
Step 4
Copy and paste your tube, give it a drop shadow and position it in middle of image.
Add your artists copyright and your name give your name a drop shadow
Step 5
We want her eyes to blink, so what we do is
Active the tube layer in the heart, and take your free hand section tool click on point to point,
and very very carefully, make a section of her eyes.
New layer and fill with black, select none see shot 1 for how it should look.
Name this eyes, close this layer for now.
Shot 1
Step 8
Copy merge and take over to A.S paste as a new image.
Back to P.S.P, open up the eyes layer, copy merge and take over to A.S,
and paste after current frame, back to P.S.P, close the eyes layer off, copy merge and take over to A.S.
And paste after current frame, set frames one and two at 5 and frame three at 300.
When happy save as a G.I.F
Hope you enjoy my tutorial.
Any problems please feel free to email me at [email protected]
Please remember this is just a guide.
I would love to see any work you have made using my tutorials
And with your permission show them on my site
Marj
Written 10th July 2014
