She's Bellissima


This tutorial is written using PSP 9 but it can also be done in other versions. This tutorial is my own creation and any resemblence to any other tutorial, is purely conicidental.
What we will need for this tutorial:-
Paint Shop Pro (PSP) any version mine was done in PSP9
Tube of choice- I using the great work of Barbara Jensen
Please do not use unless you have a license this can be purchased at her site Here http://www.barbarajensentubes.com/
Flower tube of choice, I am using one from Rainbow Coffi here http://www.psp-playground.com/
Filter Eye Candy 4000 Gradient glow
Filter Factory A Kaleidoscope
A Silver Gradient or one made from two colours from your tube I used a pattern I had in my pattern folder called Aluminium,
Lets get started
Step 1
Open a new image 600 x 250 flood fill with a light colour from your tube
Step 2
Open your flower tube, copy and paste move over to the left hand side
Duplicate your tube, on the original Filter Factory A Kaleidoscope Shot 1

Play around with the settings I used the ones above
The tube will be in the middle of image so move it under the flower
Step 3
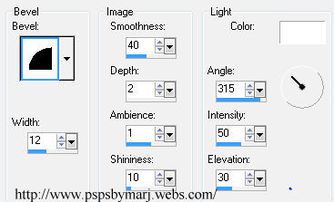
Take your pen tool line size 6 I used foreground a silver gradient, background black
And draw a line from top to bottom, to make a straight line hold down the shift key,convert to raster layer, do a inner bevel, as below Shot 2
The tube will be in the middle of image so move it under the flower
Step 3
Take your pen tool line size 6 I used foreground a silver gradient, background black
And draw a line from top to bottom, to make a straight line hold down the shift key,convert to raster layer, do a inner bevel, as below Shot 2
Step 4
Copy and paste your tube, drop shadow, move to the left hand side over the,
flower,duplicate and mirror on this lower opacity down to 50-54 or
which ever looks best for your tube, drop shadow, of choice I used H-V 3 Opacity 50 blur 5
Step 5
I put a element on mine but that's up to you, see my tag, again did the same drop shadow
Step 6
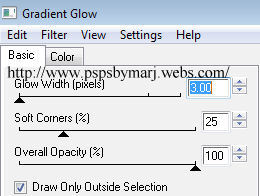
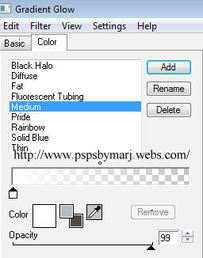
New Raster layer Select all, Modify, Contact 6, Invert, fill with the silver gradient or patten
Then Eye Candy Gradient Glow with medium Black Shot 3
Shot 3 and 4
Copy and paste your tube, drop shadow, move to the left hand side over the,
flower,duplicate and mirror on this lower opacity down to 50-54 or
which ever looks best for your tube, drop shadow, of choice I used H-V 3 Opacity 50 blur 5
Step 5
I put a element on mine but that's up to you, see my tag, again did the same drop shadow
Step 6
New Raster layer Select all, Modify, Contact 6, Invert, fill with the silver gradient or patten
Then Eye Candy Gradient Glow with medium Black Shot 3
Shot 3 and 4
|
|
Step 7
Add a saying or use the one I have, I used Edwardian Script black foreground, background nil tag ,
I did not shadow the text as it did not seem to need it
Add your name and your copyright licence
Step 8
For your AV crop the part you want to use, I used the flower merge visible, add a new Raster layer and repeat step 7.
Please remeber to add info if you use any part of youtr tube
Hope you enjoyed my tut
Marj
Would love to see your results
Written by Marj October 2010
