XO = Love


This tutorial is my own creation and any resemblance to any other tutorial, is purely coincidental.
Please do not copy as use as your own work
This tutorial is written using PSP 9 but it can also be done in other version
I am using the work of Barbara Jensen
Please do not use unless you have a license
This can be purchased at her site here http://www.barbarajensentubes.com/
Mask of choice I am using one by Narah Abstract 86 sorry I can not share,
but you can get her masks at her site
Background of choice I used one I had in my PSP
Drop Shadow I used was H & V 4 Opacity 50 Blur 5
Font of choice I used Arial Black
Lets begin
Step 1.
Open a image 600 x 300 fill with #2e2c2f, name this background 1,
New Raster Layer fill with #f092a0 name this background 2,
on this layer apply your mask the way you usual do
Step 2.
New Raster Layer Select all and copy and paste your background into section,
Blend mode 48, Effects Edge Enhance
Step 3
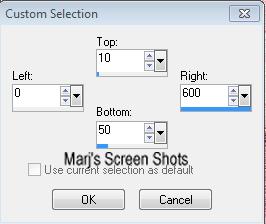
Take your section tool and make a section at the top of your tag, see shot 1,
promote to layer, new raster layer, fill this with a darker colour from your tube
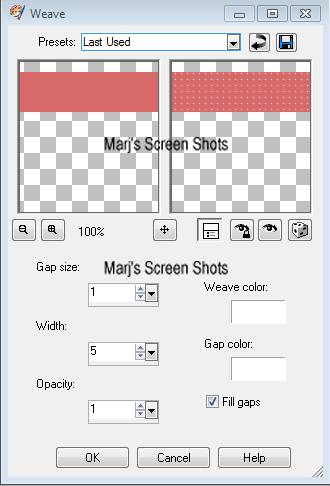
Effects weave, shot 2 duplicate and flip, merge down, drop shadow,
Name this line, you can now delete your promoted layer
SHOT 1
Shot 2
Step 4
Take your section tool and using Eclipse tool make one on the left hand side,
you do not want a full ellipse promote to section, invert,
copy and paste your tube I resized mine by 80%,
hit delete select none, blend mode Luminance,
again you can delete your promoted layer.
Step 5
Copy and paste your tube again and move to the right hand side,
give it a drop shadow, take your crop tool and crop your tag at this stage.
At this stage do shift D this is for your AV, put to one side
Step 6
New raster layer and fill with a dark colour from your tube or black,
section all, modify, contact by 10 hit delete select none,
apply the same weave as you used earlier, apply a drop shadow of choice
Step 7
Active your line layer and using your text tool use a bold font,
add a saying or use like I did XO repeat till you have covered the top line,
you can use the same on the bottom line or do as I did,
or your name, lower the text down to 48, play around with the text till your happy with it,
remember my tutorials are just guides
Add your copyright and name. I also lowered my name to 48, give it a drop shadow
Step 8
Open up the image you put to one side and crop the image you want to 150 X 150
and apply Step 4, please remember if you use any part of your tube to add your copyright
Hope you enjoy my tutorial, and problems please feel free to email me at [email protected]
Marj
Written 6th July 2013
