Butter wouldn't Melt

This tutorial is written using PSP 9 but it can also be done in other versions.
This tutorial is my own creation and any resemblence to any other tutorial, is purely conicidental.
Please do not copy and use as your own work
Paint Shop Pro (PSP) any version mine was done in PSP 9
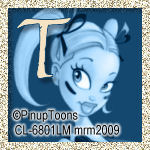
Tube of choice- I using the great work of PinupToons I brought my tube when the artist was with CILM
Please do not use unless you have a license which you can get here http://www.cdoestore.com/
Filter Eye Candy 4000 Gradient glow
Filter MuRa's copies
Filter Xero Fritillary
Two colours from your tube one dark one light
Remember to save often
~~~~~~~~~
Lets get started
~~~~~~~~~
Step 1
Open a image 200 X 200 flood fill with your dark colour from your tube,
copy and paste the face of your tube, crop and sharpen, if it needs it.
~~~~~~~~~
Step 2
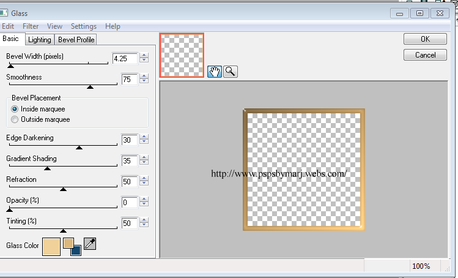
New raster layer fill with your light colour, select all modify contact by 8 hit delete,
then apply Eye Candy glass this will be your frame
Shot 1
Drop shadow of choice I used H V 3 opacity 50 and blur, we need to make a copy of this image, so do shift D,
we will call these two frames,1 and 2 working on frame 1 click on tube do Screen on the tube,
then merge visible, also merge frame 2, put to one side BUT leave the tube as it is, we will need these two later
~~~~~~~~~
Step 3
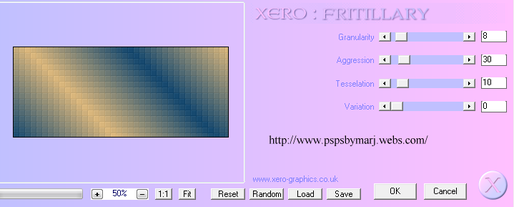
Open new image 600 x 250, flood fill with a gradient made with a dark and light colour from your tube,
Liner Angle 45 Repeat 2, now do Xero Fritillary, Shot 2
we will call these two frames,1 and 2 working on frame 1 click on tube do Screen on the tube,
then merge visible, also merge frame 2, put to one side BUT leave the tube as it is, we will need these two later
~~~~~~~~~
Step 3
Open new image 600 x 250, flood fill with a gradient made with a dark and light colour from your tube,
Liner Angle 45 Repeat 2, now do Xero Fritillary, Shot 2
~~~~~~~~~
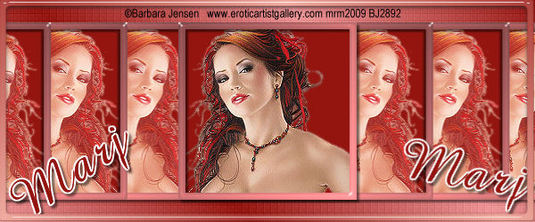
Step 4
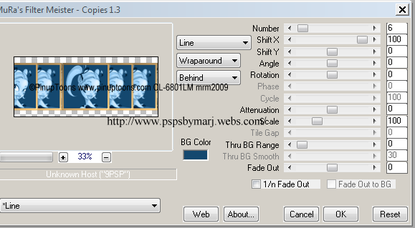
Copy and paste the frame 1 MuRa's copies Line same drop shadow Shot 3
Step 4
Copy and paste the frame 1 MuRa's copies Line same drop shadow Shot 3
~~~~~~~~~
Step 5
Now copy and paste frame 2, in middle of image
~~~~~~~~~
Step 6
New raster Layer fill with light colour select modify by 8 hit delete, select none , keep active,
Adjust add noise Uniform 35
Add your name and copywrite
~~~~~~~~~
Step 7
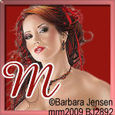
AV
I made the AV from one of the frames, resize it to 150 x 150
PLEASE remember to also put your copywrite on AV
For my second set I used the great work of Barbara Jensen
Please do not use unless you have a license this can be purchased at her site
Here http://www.barbarajensentubes.com/
I hope you enjoyed my tutorial.
Marj
Step 5
Now copy and paste frame 2, in middle of image
~~~~~~~~~
Step 6
New raster Layer fill with light colour select modify by 8 hit delete, select none , keep active,
Adjust add noise Uniform 35
Add your name and copywrite
~~~~~~~~~
Step 7
AV
I made the AV from one of the frames, resize it to 150 x 150
PLEASE remember to also put your copywrite on AV
For my second set I used the great work of Barbara Jensen
Please do not use unless you have a license this can be purchased at her site
Here http://www.barbarajensentubes.com/
I hope you enjoyed my tutorial.
Marj
Written by Marj February 2011
