Who ME ?
This tutorial is my own creation and any resemblance to any other tutorial, is purely coincidental.
Please do not copy as use as your own work if you wish to translate please email me
It’s assumed that you have working knowledge on how to use filters/plugins.
This tutorial is written using PSP 9 but it can also be done in other versions
Animation Shop I will refer to this as AS
Filter Alien Skin Eye Candy 5 Impact Glass
Filter Unlimited 2.0 Render Clouds
Tube of choice- I using the work of Bez Boardman you can find her work here
http://www.renderosity.com/mod/gallery/browse.php?username=Bez
You have to have permission to use her art.
Drop Shadow I used was H & V 4 Opacity 40 Blur 5
Font of choice I used Comic Sans MS
Lets begin
Remember to save often
Step 1.
First we are going to make the small image,
open a image 600 x 400, *** take your preset tool on Rectangle,
and make a box in the middle of your image,
using the a light colour I used #f7cf9f and background nil,
make a box click in side with your magic wand and Modify, expand by 2,
new raster layer, fill with a darker colour from your tube, invert, KEEP selected,
copy and paste your tube re-size if necessary give it a drop shadow,
hit delete on your tube select none give your frame a drop shadow,
and apply Effects blinds Width 10 Opacity 20 Horizontal, ,
and Light from left/top ticked and color a dark one I used #885026 merge visible **** now apply Alien Skin Eye Candy 5 Impact Glass, settings Clear, put to one side.
Step 2
New image 600 x 400 fill with your light colour, name this background,
repeat from *** to **** but this time when you paste your tube,
put to the right hand side, give your tube a drop shadow,
crop your image.
Step 3
Copy and and paste the image you made earlier,
and place on the left hand side of your image see mine for ref:
give this a drop shadow, give your tag a saying or use mine
Step 3
Add your copywrite and name, with your back ground layer active,
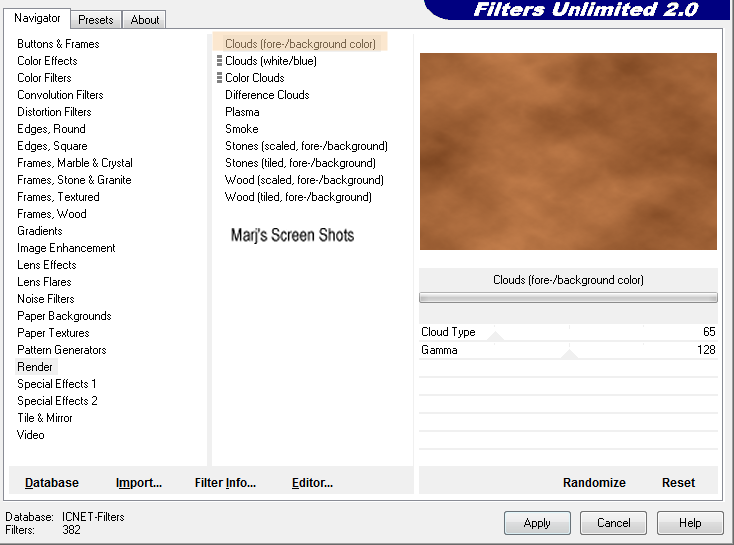
apply Filter Unlimited 2.0 Render Clouds, see shot,
copy merge and take to AS and paste as a new image, back to PSP, undo Render Clouds re-apply but hit the random button,
I did the animation at 50 but leave this up to you,
when happy save as a gif
Shot 1
Please do not copy as use as your own work if you wish to translate please email me
It’s assumed that you have working knowledge on how to use filters/plugins.
This tutorial is written using PSP 9 but it can also be done in other versions
Animation Shop I will refer to this as AS
Filter Alien Skin Eye Candy 5 Impact Glass
Filter Unlimited 2.0 Render Clouds
Tube of choice- I using the work of Bez Boardman you can find her work here
http://www.renderosity.com/mod/gallery/browse.php?username=Bez
You have to have permission to use her art.
Drop Shadow I used was H & V 4 Opacity 40 Blur 5
Font of choice I used Comic Sans MS
Lets begin
Remember to save often
Step 1.
First we are going to make the small image,
open a image 600 x 400, *** take your preset tool on Rectangle,
and make a box in the middle of your image,
using the a light colour I used #f7cf9f and background nil,
make a box click in side with your magic wand and Modify, expand by 2,
new raster layer, fill with a darker colour from your tube, invert, KEEP selected,
copy and paste your tube re-size if necessary give it a drop shadow,
hit delete on your tube select none give your frame a drop shadow,
and apply Effects blinds Width 10 Opacity 20 Horizontal, ,
and Light from left/top ticked and color a dark one I used #885026 merge visible **** now apply Alien Skin Eye Candy 5 Impact Glass, settings Clear, put to one side.
Step 2
New image 600 x 400 fill with your light colour, name this background,
repeat from *** to **** but this time when you paste your tube,
put to the right hand side, give your tube a drop shadow,
crop your image.
Step 3
Copy and and paste the image you made earlier,
and place on the left hand side of your image see mine for ref:
give this a drop shadow, give your tag a saying or use mine
Step 3
Add your copywrite and name, with your back ground layer active,
apply Filter Unlimited 2.0 Render Clouds, see shot,
copy merge and take to AS and paste as a new image, back to PSP, undo Render Clouds re-apply but hit the random button,
I did the animation at 50 but leave this up to you,
when happy save as a gif
Shot 1
Hope you enjoy my tutorial, and problems please feel free to email me at [email protected]
please remember this is just a guide,
I would love to see any work you have made using my tutorials
Marj
Written 26th August 2013
please remember this is just a guide,
I would love to see any work you have made using my tutorials
Marj
Written 26th August 2013
