Mermaid


This tutorial is my own creation and any resemblance to any other tutorial, is purely coincidental.
Please do not copy as use as your own work
This tutorial is written using PSP 9 but it can also be done in other versions
Animation Shop
Filter Pent.com Colour Dot
Filter Eye Candy 5 Impact Perspective Shadow
Filter Eye Candy 400 Glass
Tubes of choice I used Jamie Kidd I brought mine when she was at CLIM
She is now at CDO here http://cdoestore.com/
Use a mask of choice. I used a mask called "mask_02".
Drop Shadow I used was H & V 2 Opacity 40 Blur 10
Font of choice I used A Charming Font Italic
Lets begin
Remember to save often
Step 1
Open a Image 600 X 200, take your preset tool, background set to null, foreground to your dark colour,
make three rectangles, apply Eye Candy 400 Glass,
take your magic wand and click inside the box's, fill this with your colour,
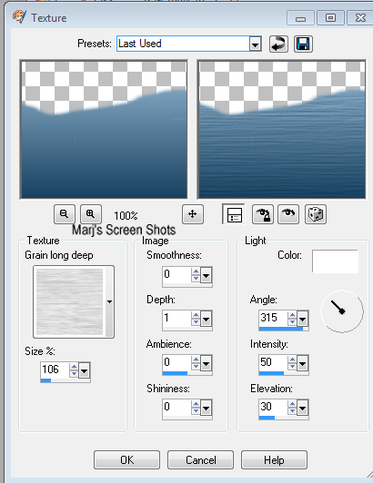
keep selected and do a texture, with it still selected paste one of your tubes,
I resized my tube's by 50% , Invert hit delete, repeat with your other two frames, merge visible,
and sharpen them, name it frame, set to one side for now
Step 2
Open Image 600 X 400 fill with a dark colour for your tube,
new raster layer fill with a lighter colour, apply your mask, merge group,
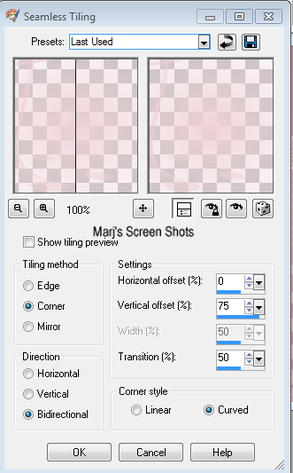
working on your group layer apply Effect Image effect seamless tilling shot 1,
duplicate, image mirror flip merge down, go to your layer pallet lower your opicatiy to 50 Adjust sharpen.
Shot 1
Please do not copy as use as your own work
This tutorial is written using PSP 9 but it can also be done in other versions
Animation Shop
Filter Pent.com Colour Dot
Filter Eye Candy 5 Impact Perspective Shadow
Filter Eye Candy 400 Glass
Tubes of choice I used Jamie Kidd I brought mine when she was at CLIM
She is now at CDO here http://cdoestore.com/
Use a mask of choice. I used a mask called "mask_02".
Drop Shadow I used was H & V 2 Opacity 40 Blur 10
Font of choice I used A Charming Font Italic
Lets begin
Remember to save often
Step 1
Open a Image 600 X 200, take your preset tool, background set to null, foreground to your dark colour,
make three rectangles, apply Eye Candy 400 Glass,
take your magic wand and click inside the box's, fill this with your colour,
keep selected and do a texture, with it still selected paste one of your tubes,
I resized my tube's by 50% , Invert hit delete, repeat with your other two frames, merge visible,
and sharpen them, name it frame, set to one side for now
Step 2
Open Image 600 X 400 fill with a dark colour for your tube,
new raster layer fill with a lighter colour, apply your mask, merge group,
working on your group layer apply Effect Image effect seamless tilling shot 1,
duplicate, image mirror flip merge down, go to your layer pallet lower your opicatiy to 50 Adjust sharpen.
Shot 1
Step 3
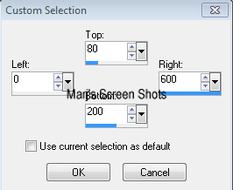
Take your section tool and make a section see shot 2, fill this with your dark colour,
apply Effects Textures blinds see shot 3 and soft light, duplicate merge down,
effects enhance edges lower this to about 80,
Shot 2
Take your section tool and make a section see shot 2, fill this with your dark colour,
apply Effects Textures blinds see shot 3 and soft light, duplicate merge down,
effects enhance edges lower this to about 80,
Shot 2
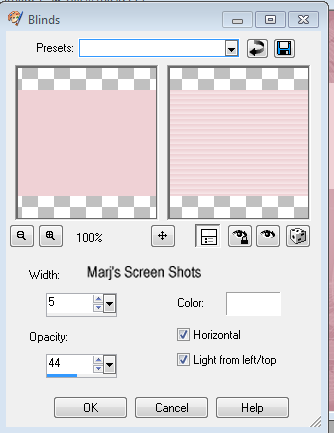
Shot 3
Step 4
Open up your Frame image, you made earlier and copy and paste it on the layer you have just made,
and lower this to 80 opacity and apply Perspective Shadow,
resize if it needs it, I used blurry or you can use a heavy drop shadow this is your choice
Step 5
Add your tube place where you want it,
add a new raster layer and take your paint brush and make it look like she is under waves,
keep active and apply effects Textures shot 4.
I also made her a rock but leave this up to you, you can use my waves if you wish,
I have put it at end of tutorial
Shot 4
Do shift and D for your forum and AV tags.
Step 6
Add your copyright and name, and a saying if you wish
Open up Animation Shop
Step 7
Close all layer apart from your wave layer, take over to AS, apply Insert Image Effects Waves,
Shot 5
Step 6
Add your copyright and name, and a saying if you wish
Open up Animation Shop
Step 7
Close all layer apart from your wave layer, take over to AS, apply Insert Image Effects Waves,
Shot 5
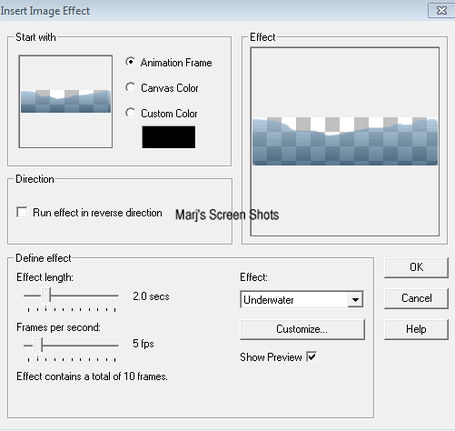
Now go back to PSP close off your wave layer and open all others, take over to AS make 10 frames,
and the Edit all Propagate, do the same with your wave animation and put the wave on to the main tag,
view if happy save as GIF
Step 8
Open up one of the images you put to one side, you need to crop this to 600 X 250,
move your tube and frame to where you want then do a crop 600 x 250
by doing this way you can move it to where you want, rather then just the top of tag as I usual say do
I moved my tube waves rock and frame down a bit see my tag for ref, now repeat step 7.
Step 8
Open your other image and crop 150 X 150.
REMEMBRING to add your copyright and name
Hope you enjoyed my tut
I would love to see your results to add to my site
Marj
Written 27th April 2012
My wave just right click as save to your computer


Alice made this great set using the work of Anne Stokes thanks hon for trying my tutorial
