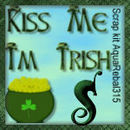
Kiss Me I'm Irish
This tutorial is my own creation and any resemblence to any other tutorial, is purely conicidental.
Please do not copy it and use it as your own work
This tutorial is written using PSP 9 but it can also be done in other versions.
Filter Mura's Clouds
Filter Eye Candy 4000
Font of choice
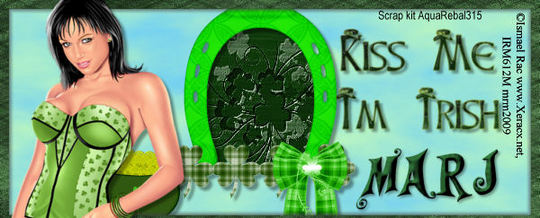
Tube of choice I used Ismael Rac
You must have the proper license to use his work and this can be purchase at from his new site http://xeracx.net/Store
but you can still use your old license from his old site
Scrap Kit of choice I used one from AquaRebal that was on a blog train, from MisFits Creations called St Patrick's Day Theme http://creativemisfitscreations.blogspot.com/2010/03/scrap-kits-st-patricks-day-theme.html
Drop Shadow I used was H, V 4 Opacity 40 Blur 4
Remember to save often
Lets get started
Step 1
Open image 600 x 250 Transparent
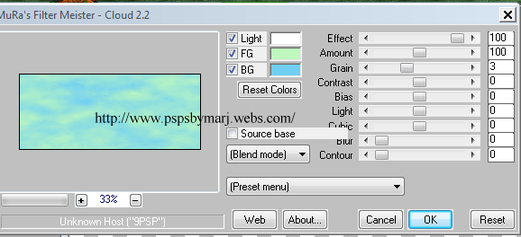
Go to MuRa Cloud the colours I used were Foreground #a9eccd Background #7cd7ea
You should end up with some thing like this Shot 1
Please do not copy it and use it as your own work
This tutorial is written using PSP 9 but it can also be done in other versions.
Filter Mura's Clouds
Filter Eye Candy 4000
Font of choice
Tube of choice I used Ismael Rac
You must have the proper license to use his work and this can be purchase at from his new site http://xeracx.net/Store
but you can still use your old license from his old site
Scrap Kit of choice I used one from AquaRebal that was on a blog train, from MisFits Creations called St Patrick's Day Theme http://creativemisfitscreations.blogspot.com/2010/03/scrap-kits-st-patricks-day-theme.html
Drop Shadow I used was H, V 4 Opacity 40 Blur 4
Remember to save often
Lets get started
Step 1
Open image 600 x 250 Transparent
Go to MuRa Cloud the colours I used were Foreground #a9eccd Background #7cd7ea
You should end up with some thing like this Shot 1
Step 2
Open AR315_IC_ele26 resize to fit your image53%, click inside with magic wand,
Select modify expand by 2 pixels, select invert,
copy and paste AR315_IC_paper04 resize by 80%, as you want the middle to stand out, hit delete, select none,
D S the frame move paper down
Open AR315_IC_ele35 resize 30% copy and paste on the left side.
Open AR315_IC_ele34 resize 45% paste on right side
Step 3
New Raster Select all, copy and paste a paper of choice (I used AR315_IC_paper12 )
into Selection, modify contact by 10, hit delete select none
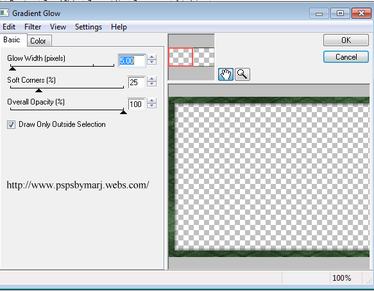
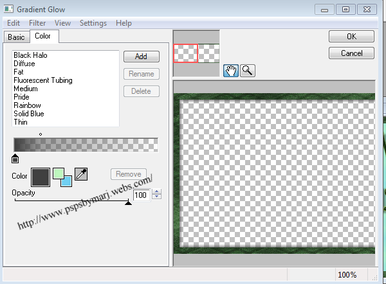
I added a Eye Candy Gradient Glow see shot 2 and 3
Open AR315_IC_ele26 resize to fit your image53%, click inside with magic wand,
Select modify expand by 2 pixels, select invert,
copy and paste AR315_IC_paper04 resize by 80%, as you want the middle to stand out, hit delete, select none,
D S the frame move paper down
Open AR315_IC_ele35 resize 30% copy and paste on the left side.
Open AR315_IC_ele34 resize 45% paste on right side
Step 3
New Raster Select all, copy and paste a paper of choice (I used AR315_IC_paper12 )
into Selection, modify contact by 10, hit delete select none
I added a Eye Candy Gradient Glow see shot 2 and 3
|
|
Step 4
Add your tube and place on the left side resize if necessary
Add your copyright and name, and a saying of choice
Step 5
Make your Aviator in the usual way, by Shift and D and crop the piece of tag you want to use
IF you use part of tube please do not forget your copyright
Hope you have enjoyed my Tutorial
Marj
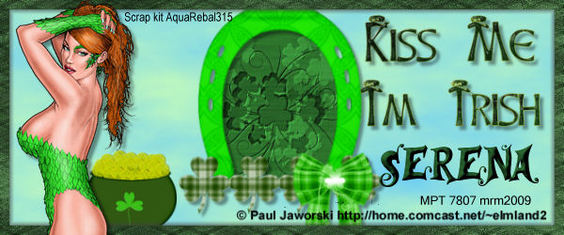
Here another sample using Paul Jaworski from MPT
Add your tube and place on the left side resize if necessary
Add your copyright and name, and a saying of choice
Step 5
Make your Aviator in the usual way, by Shift and D and crop the piece of tag you want to use
IF you use part of tube please do not forget your copyright
Hope you have enjoyed my Tutorial
Marj
Here another sample using Paul Jaworski from MPT
Written by Marj 26th February 2011
