Two Rose's


This tutorial is my own creation and any resemblance to any other tutorial, is purely coincidental.
Please do not copy as use as your own work
This tutorial is written using PSP 9 but it can also be done in other versions
Animation Shop Animation of choice
Filter FM Tiles Tools
Filter AAA Foto
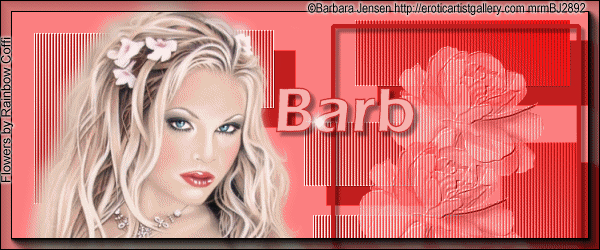
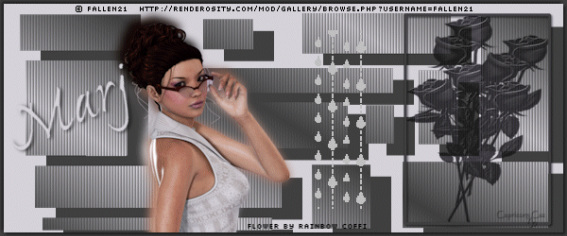
Tube of choice you need a close up, I used Barbara Jensen
Please do not use unless you have a license this can be purchased at her site
http://www.barbarajensentubes.com/
A flower or image of choice, I used one from Rainbow Coffi
Drop Shadow I used was H & V 4 Opacity 40 Blur 4
Font of choice I used Eras Demi ITC
Foreground colour #ff8080 background #fda9a9
Remember to save often
Lets begin
Step 1
Open image 600 X 400 flood fill foreground colour,
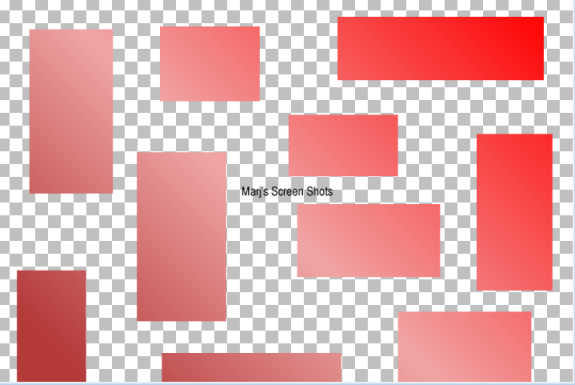
add new raster layer, use your selection tool and make a few box's see shot 1
and fill with your gradient deselect, and give them a drop shadow I used H 20 V 22 opacity 100 blur 0
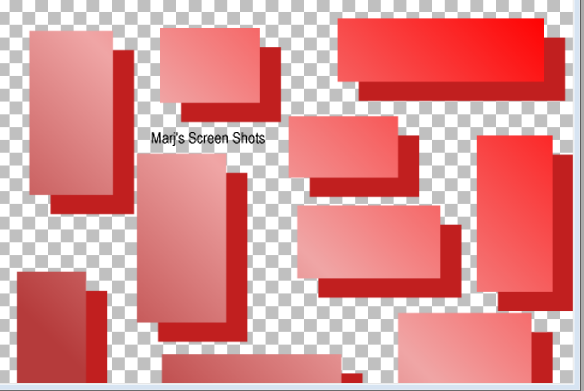
I used #c11f1f as this was a dark colour from my foreground colour, see shot 2,
apply a texture effects blinds on your box's width 3 opacity 50 light from left checked, horizontal unchecked,
again use the dark colour you used on the drop shadow, Edge Effects Enhance
Shot 1and 2
Please do not copy as use as your own work
This tutorial is written using PSP 9 but it can also be done in other versions
Animation Shop Animation of choice
Filter FM Tiles Tools
Filter AAA Foto
Tube of choice you need a close up, I used Barbara Jensen
Please do not use unless you have a license this can be purchased at her site
http://www.barbarajensentubes.com/
A flower or image of choice, I used one from Rainbow Coffi
Drop Shadow I used was H & V 4 Opacity 40 Blur 4
Font of choice I used Eras Demi ITC
Foreground colour #ff8080 background #fda9a9
Remember to save often
Lets begin
Step 1
Open image 600 X 400 flood fill foreground colour,
add new raster layer, use your selection tool and make a few box's see shot 1
and fill with your gradient deselect, and give them a drop shadow I used H 20 V 22 opacity 100 blur 0
I used #c11f1f as this was a dark colour from my foreground colour, see shot 2,
apply a texture effects blinds on your box's width 3 opacity 50 light from left checked, horizontal unchecked,
again use the dark colour you used on the drop shadow, Edge Effects Enhance
Shot 1and 2
|
|
Step 2
New raster layer take your section tool again and make a selection as shot 3,
open up your flower tube and copy and paste into the selection you just made,
I did this three times as wanted it to look like a bunch of roses,
now apply FM Tools Blend Emboss default settings, repeat,
if you do not have FM tools you can get same effect by using your User Defined Filter,
apply Luminance ( Legacy) lower your flower down to about 80 keep selected,
and apply your blinds effect again, new raster layer, select Modify Select Selection Borders both sides
and Anti-anlias checked by 2, fill with your dark colour, deselect give this frame a drop shadow.
Shot 3
Step 3
Add your tube and place on the left hand side duplicate on original,
apply Adjust Gassin blur 5 still on the original, resize by 105%, this gives her a soft edge merge,
activate the duplicate and merge down
Step 4
Do Shift D twice this is for your forum set and AV put to one side for now
Step 5
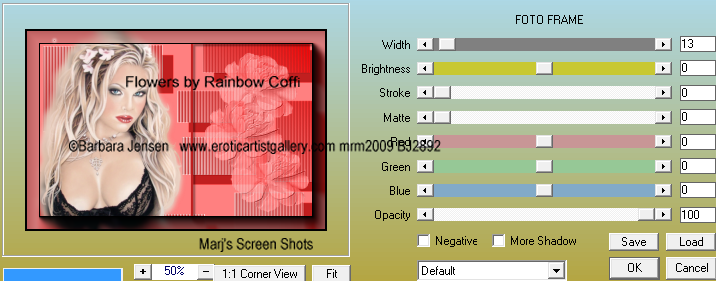
Merge visible, apply AAA Foto frame shot 4
Shot 4
Add your tube and place on the left hand side duplicate on original,
apply Adjust Gassin blur 5 still on the original, resize by 105%, this gives her a soft edge merge,
activate the duplicate and merge down
Step 4
Do Shift D twice this is for your forum set and AV put to one side for now
Step 5
Merge visible, apply AAA Foto frame shot 4
Shot 4
Add your copyright and name
Step 6
Copy and take over to AS and paste as new animation and add a nice sparkle of choice,
view and save as Gif
Step 7
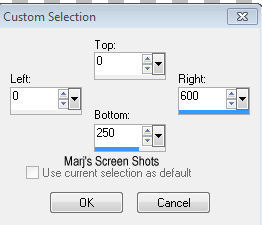
Open one of the images you closed earlier and do a section as shot 5,
image crop to section, repeat step 5 and 6,
Shot 5
Step 6
Copy and take over to AS and paste as new animation and add a nice sparkle of choice,
view and save as Gif
Step 7
Open one of the images you closed earlier and do a section as shot 5,
image crop to section, repeat step 5 and 6,
Shot 5
Step 7
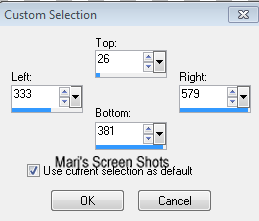
On the other image I resized by 80 % ,
then cropped it 150 v 150 using the part you want to use for your AV,
when you apply AAA Foto do width as 9, else you will lose a lot of the face,
Please remember if you use any part of tube or flower to use the right copyright
Hope you enjoyed my tut
Would love to see your results
Marj
Written on 24th April 2012
Caz made me tis great set using this tutorial thanks hon its lovely
