Waves
My Sections HERE
Unzip and put in your P.S.P Selections folder
This tutorial is my own creation and any resemblance to any other tutorial, is purely coincidental.
Please do not copy and use as your own work.
If you wish to translate please email me
It’s assumed that you have working knowledge on how to use filters/plugins.
This tutorial is written using P.S.P 16 but it can also be done in other versions
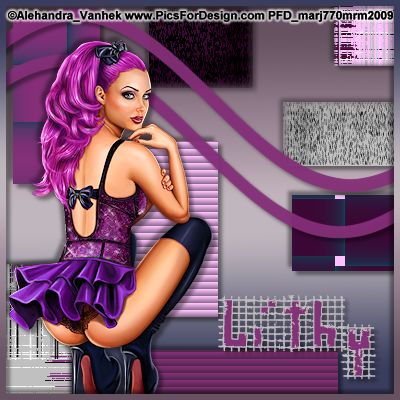
Tube of choice- I used Alehandra Vanhek
You can find her beautiful work here
www.PicsForDesign.com
Font of choice I used Raw Street Wall
Please remember to Adjust and Sharpen your Tube if you resize
Remember to save often
Step 1
New image 400 X 400 fill with a Liner gradient Angle and Repeats 0, of choice.
Name this background .I used one made from her clothes.
New raster layer, fine my Selections Rectangle 1.
Apply fill your rectangles at random, see my tag for ref:, select none.
Step 2
Take your magic wand and click inside your rectangle, and apply any textures you like.
I did Effects Wave, Fur Straw Wall and Blinds, Play around, its your choice.
Step 3
New raster layer, find my selections Wave and apply, fill with a colour from one of your rectangles.
take your pick tool and pull to edges of your image, give it a drop shadow.
Step 4
Copy and paste your tube re-size if necessary.
Give it a drop shadow, add your copyright and name.
Give your name a drop shadow,.
Step 5
Duplicate your background layer bring to top of image, Select all, Modify, Contact by 6 hit Delete.
Hope you enjoy my tutorial.
Any problems please feel free to email me at [email protected]
Please remember this is just a guide.
I would love to see any work you have made using my tutorials
And with your permission show them on my site
Marj
Written 29th April 2014
Unzip and put in your P.S.P Selections folder
This tutorial is my own creation and any resemblance to any other tutorial, is purely coincidental.
Please do not copy and use as your own work.
If you wish to translate please email me
It’s assumed that you have working knowledge on how to use filters/plugins.
This tutorial is written using P.S.P 16 but it can also be done in other versions
Tube of choice- I used Alehandra Vanhek
You can find her beautiful work here
www.PicsForDesign.com
Font of choice I used Raw Street Wall
Please remember to Adjust and Sharpen your Tube if you resize
Remember to save often
Step 1
New image 400 X 400 fill with a Liner gradient Angle and Repeats 0, of choice.
Name this background .I used one made from her clothes.
New raster layer, fine my Selections Rectangle 1.
Apply fill your rectangles at random, see my tag for ref:, select none.
Step 2
Take your magic wand and click inside your rectangle, and apply any textures you like.
I did Effects Wave, Fur Straw Wall and Blinds, Play around, its your choice.
Step 3
New raster layer, find my selections Wave and apply, fill with a colour from one of your rectangles.
take your pick tool and pull to edges of your image, give it a drop shadow.
Step 4
Copy and paste your tube re-size if necessary.
Give it a drop shadow, add your copyright and name.
Give your name a drop shadow,.
Step 5
Duplicate your background layer bring to top of image, Select all, Modify, Contact by 6 hit Delete.
Hope you enjoy my tutorial.
Any problems please feel free to email me at [email protected]
Please remember this is just a guide.
I would love to see any work you have made using my tutorials
And with your permission show them on my site
Marj
Written 29th April 2014
