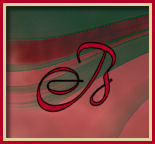
Lady Geisha
This tutorial is my own creation and any resemblance to any other tutorial, is purely coincidental.
Please do not copy and use as your own work, and please do not translate with out my permission
This tutorial is written using PSP 9 but it can also be done in other versions
Animation Shop
Filters Alien Eye Candy Nature Smoke
Tube of choice I used Marco Guaglione
You can get the artist work here http://psptubesemporium.com/index.php?p=home
A background texture of choice I used one of Vix's and colourized it to match my tube,
you can find her maskes and textures here
http://vixpsp.blogspot.com/search/label/Tag%20Textures
Mask of choice I used one I had in my PSP so can not share
Drop Shadow I used was H & V 4 Opacity 50 Blur 5
Font of choice I used FrancineHmk
Word art of choice
Remember to save often
Two colours from your tube foreground dark and a light one for your background
Step 1
Open a image 600 x 400 select all, copy and paste into selection, a background Texture of choice,
colourize to match your tube rename this background, lower this to 68 deselect,
new raster layer fill with your light background colour,
new layer fill with your dark colour, apply your mask, merge group, rename this smoke,
and set the blend mode to difference and lower it to about 50,
have a play to get the effect you like
Step 2
Copy and paste your tube resize if necessary, place it on the right see my tag,
and give it a blurry drop shadow.
Step 3
Do shift D twice this is for your fourm tag and AV, put to one side, for now
Step 4
New raster layer, fill with your light colour, Select all, Modify,
Contact by 6 pixels, hit delete, deselect,
new raster layer fill with your dark colour Select all, Modify, Contact by 3 pixels, hit delete, deselect,
merge down, add a drop shadow.
Add your name and copyright and word art of choice, open up Animation Shop
Step5
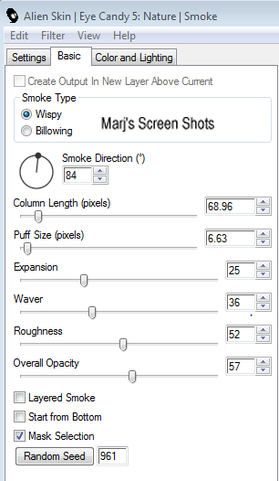
Active your smoke layer and apply Eye Candy Nature Smoke see shot 1 for settings,
copy merge and take to AS and paste as a new animation, back to PSP and Edit and undo the smoke,
now redo the smoke but hit the random botton, take to AS and paste after current frame,
back to PSP and Edit and undo the smoke,
now redo the smoke but hit the random botton take to AS and paste after current frame
I set, current frame, the frame properties at 30, when happy save.
Shot 1
Please do not copy and use as your own work, and please do not translate with out my permission
This tutorial is written using PSP 9 but it can also be done in other versions
Animation Shop
Filters Alien Eye Candy Nature Smoke
Tube of choice I used Marco Guaglione
You can get the artist work here http://psptubesemporium.com/index.php?p=home
A background texture of choice I used one of Vix's and colourized it to match my tube,
you can find her maskes and textures here
http://vixpsp.blogspot.com/search/label/Tag%20Textures
Mask of choice I used one I had in my PSP so can not share
Drop Shadow I used was H & V 4 Opacity 50 Blur 5
Font of choice I used FrancineHmk
Word art of choice
Remember to save often
Two colours from your tube foreground dark and a light one for your background
Step 1
Open a image 600 x 400 select all, copy and paste into selection, a background Texture of choice,
colourize to match your tube rename this background, lower this to 68 deselect,
new raster layer fill with your light background colour,
new layer fill with your dark colour, apply your mask, merge group, rename this smoke,
and set the blend mode to difference and lower it to about 50,
have a play to get the effect you like
Step 2
Copy and paste your tube resize if necessary, place it on the right see my tag,
and give it a blurry drop shadow.
Step 3
Do shift D twice this is for your fourm tag and AV, put to one side, for now
Step 4
New raster layer, fill with your light colour, Select all, Modify,
Contact by 6 pixels, hit delete, deselect,
new raster layer fill with your dark colour Select all, Modify, Contact by 3 pixels, hit delete, deselect,
merge down, add a drop shadow.
Add your name and copyright and word art of choice, open up Animation Shop
Step5
Active your smoke layer and apply Eye Candy Nature Smoke see shot 1 for settings,
copy merge and take to AS and paste as a new animation, back to PSP and Edit and undo the smoke,
now redo the smoke but hit the random botton, take to AS and paste after current frame,
back to PSP and Edit and undo the smoke,
now redo the smoke but hit the random botton take to AS and paste after current frame
I set, current frame, the frame properties at 30, when happy save.
Shot 1
Step 6
Open one of the images you closed earlier move anything around you wish to,
grab your tool and crop your image 600 X 250, and then repeat step 5,
now open your other image and crop to 150 X 150 I did not animate this as it did not look right
Hope you enjoyed my tut, would love to see your results, any questions or
if you need help email me here >>>>>>> [email protected]
Marj
Written 22nd May 2012
