Fairy Wings
This tutorial is my own creation and any resemblance to any other tutorial, is purely coincidental.
Please do not copy as use as your own work
This tutorial is written using PSP 9 but it can also be done in other versions
Animation Shop
Filter Factory MuRa's Meister Cloud
Tube of choice- I using the great work of Barbara Jensen
Please do not use unless you have a license this can be purchased at her site
Here http://www.barbarajensentubes.com/
Drop Shadow I used was V & H 3 Opacity 50 Blur 5
Font of choice I used Fairy Dust
Lets begin
Remember to save often
Colours I used #27863c, #baf0c4
Step 1
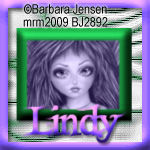
We are going to make the small picture first, open a image 210 x 170
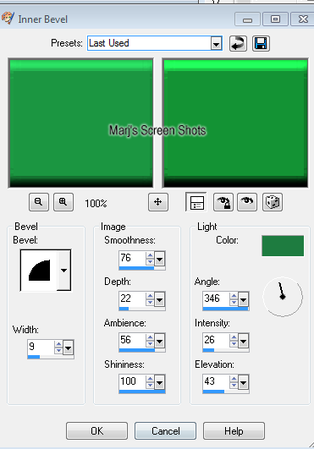
fill this with your darker colour, apply Effects Inner Bevel, shot 1
now take your selection tool and make a square in the middle of the Bevel,
promote selection to layer, select Modify Expand by 1, Invert,
copy your tube and use the part of tube you want, I just wanted her head,
hit delete, apply Adjust Hue and Saturation hue at 180 and Saturation at 67,
merge visible and put to one side.
Shot 1
Please do not copy as use as your own work
This tutorial is written using PSP 9 but it can also be done in other versions
Animation Shop
Filter Factory MuRa's Meister Cloud
Tube of choice- I using the great work of Barbara Jensen
Please do not use unless you have a license this can be purchased at her site
Here http://www.barbarajensentubes.com/
Drop Shadow I used was V & H 3 Opacity 50 Blur 5
Font of choice I used Fairy Dust
Lets begin
Remember to save often
Colours I used #27863c, #baf0c4
Step 1
We are going to make the small picture first, open a image 210 x 170
fill this with your darker colour, apply Effects Inner Bevel, shot 1
now take your selection tool and make a square in the middle of the Bevel,
promote selection to layer, select Modify Expand by 1, Invert,
copy your tube and use the part of tube you want, I just wanted her head,
hit delete, apply Adjust Hue and Saturation hue at 180 and Saturation at 67,
merge visible and put to one side.
Shot 1
Step 2
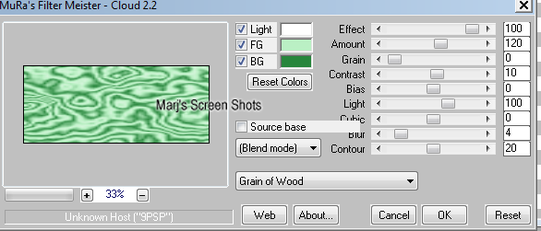
Open a image 600 x250 apply MuRa's Meister Cloud, shot 2,
duplicate, working on the original,
Adjust Hue and Saturation both at 0, set this layer to hard light,
activate the duplicate layer and apply soft light, merge down.
Shot 2
Open a image 600 x250 apply MuRa's Meister Cloud, shot 2,
duplicate, working on the original,
Adjust Hue and Saturation both at 0, set this layer to hard light,
activate the duplicate layer and apply soft light, merge down.
Shot 2
Step 3
Copy and paste your tube place her where you wish
I placed mine on the left side, give her a drop shadow, crop your tag,
open up the small image you made and place it on the other side of your tag from your tube,
if it looks a bit big just resize it, give it a drop shadow. Do Shift and D this is for your AV put to one side.
Step 4
New raster layer fill with a colour of choice, I picked a colour from her wings,
Select all Modify Contact by 10 hit delete,
apply a inner bevel using the same settings as you used earlier, now you can see why it had to be contact by 10.
give this the same drop shadow.
Add your copyright and name. I also did a inner bevel on my name
And save if you do not wish to animate the tag
Step 5
Open up Animation Shop close all layers apart from your bottom one and take this over to AS,
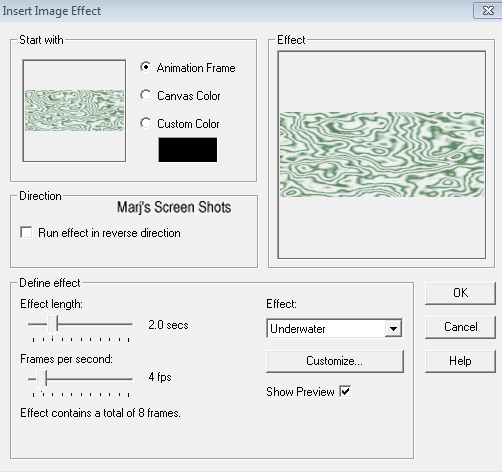
paste as new image and Effects Insert Image Effect Underwater shot 3,
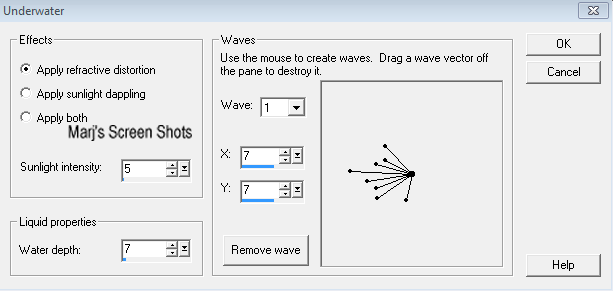
Cick on customize and apply the following
wave 1 X 7 Y 7 wave 2 X -27 Y 28 wave 3 X-6 Y-26 wave 4 X -62 Y 3 see shot 4
this will give you 9 frames go to frame 1 and delete it,
back to PSP and close the bottom layer off and open the rest up copy merged and take over to AS,
paste as new image, Edit and duplicate till you have 8 frames,
go to the animation you made of underwater Edit all Propagate,
do the same with the image you just made, and very carefully paste it into the underwater image,
view and save.
Shot 3 and 4
Copy and paste your tube place her where you wish
I placed mine on the left side, give her a drop shadow, crop your tag,
open up the small image you made and place it on the other side of your tag from your tube,
if it looks a bit big just resize it, give it a drop shadow. Do Shift and D this is for your AV put to one side.
Step 4
New raster layer fill with a colour of choice, I picked a colour from her wings,
Select all Modify Contact by 10 hit delete,
apply a inner bevel using the same settings as you used earlier, now you can see why it had to be contact by 10.
give this the same drop shadow.
Add your copyright and name. I also did a inner bevel on my name
And save if you do not wish to animate the tag
Step 5
Open up Animation Shop close all layers apart from your bottom one and take this over to AS,
paste as new image and Effects Insert Image Effect Underwater shot 3,
Cick on customize and apply the following
wave 1 X 7 Y 7 wave 2 X -27 Y 28 wave 3 X-6 Y-26 wave 4 X -62 Y 3 see shot 4
this will give you 9 frames go to frame 1 and delete it,
back to PSP and close the bottom layer off and open the rest up copy merged and take over to AS,
paste as new image, Edit and duplicate till you have 8 frames,
go to the animation you made of underwater Edit all Propagate,
do the same with the image you just made, and very carefully paste it into the underwater image,
view and save.
Shot 3 and 4
Step 6 Back to PSP and open the image you put to one side crop to 150 X 150 use any part of your tag
I chose the small box I had made, I did not animate this as it did not look right,
add name and copyright
There done
Hope you enjoyed my tut, and I would love to see any thing you make using this
or any other of my tutorials
Marj
Written 6th May 2012
I chose the small box I had made, I did not animate this as it did not look right,
add name and copyright
There done
Hope you enjoyed my tut, and I would love to see any thing you make using this
or any other of my tutorials
Marj
Written 6th May 2012
