Feather

This tutorial is my own creation and any resemblance to any other tutorial, is purely coincidental.
Please do not copy as use as your own work
This tutorial is written using PSP 9 but it can also be done in other versions
Animation Shop
Filter Eye Candy 5 Impact Perspective Shadow
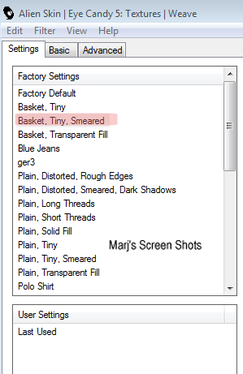
Filter Eye Candy 5 Nature Basket TinySmeared
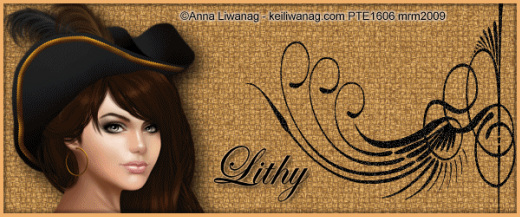
Tube of choice I am using the lovely work of Anna Liwanag, you can get her work here http://psptubesemporium.com/
Drop Shadow I used was H & V 2 Opacity 40 Blur 10
Font of choice I used BixAntiqueScript
Lets begin
Remember to save often
Step 1
Open image 600 X 400 flood fill with a colour from your tube, apply Eye Candy 5 Nature Basket TinySmeared, shot 1
Please do not copy as use as your own work
This tutorial is written using PSP 9 but it can also be done in other versions
Animation Shop
Filter Eye Candy 5 Impact Perspective Shadow
Filter Eye Candy 5 Nature Basket TinySmeared
Tube of choice I am using the lovely work of Anna Liwanag, you can get her work here http://psptubesemporium.com/
Drop Shadow I used was H & V 2 Opacity 40 Blur 10
Font of choice I used BixAntiqueScript
Lets begin
Remember to save often
Step 1
Open image 600 X 400 flood fill with a colour from your tube, apply Eye Candy 5 Nature Basket TinySmeared, shot 1
Step 2
Go to your present tool and find a nice corner pattern
I can not tell you were I got mine from as I have had it while,
but there are a loads of site's that do great brushes and persets
I put mine on the right hand side, name this as doodle, duplicate this twice, name these as doodle 2 and 3,
apply Adjust add noise Uniform Monochrome checked noise 50 apply to your doodle 2 layer but make it 55
and the do same to doodle 3 layer but make this 60
Step 3
Copy and paste your tube resize if needed, I did mine by 80% and adjust and Sharpen,
crop your image, do Shift and D put this to one side
Step 4
Add new raster layer fill with a light colour from your tube,
Select all Modify Contact by 3 pixels, hit delete, select none,
give this a drop shadow I used V and H 3 Opacity 40 blur 5, repeat but do V and H -3
Add your copyright and name
Open up AS.
Step 5
With your doodle 2 and 3 closed, copy merge and take to AS, paste as a new animation,
back to PSP closed doodle 1 and open 2 copy merge take to AS,
and paste after current frame, do the same with doodle 3
View and if happy save as GIF
Step 6
Open the image you put to one side and crop to 150 x150, repeat step 4 and 5,
Please remember to add copyright is you use any part of your tube
Hope you enjoyed my tutorial
Marj
Written 15th April 2012
