Fun in the Sun


My back ground HERE
This tutorial is my own creation and any resemblance to any other tutorial, is purely coincidental.
Please do not copy and use as your own work.
If you wish to translate please email me
It’s assumed that you have working knowledge on how to use filters/plugins.
This tutorial is written using P.S.P 16 but it can also be done in other versions
Animation Shop I will Ref to this as A.S
Filter MuRa's Meister Cloud
Tube of choice- I used Psyco Jimi you can get his work here http://www.mytubedart.com/catalog.php
Scrap kit of choice I used one Jaelop Designs called Summer Vacations here http://jaelop.blogspot.com/
Font of choice I used American Purpose
Please remember to Adjust and Sharpen your Tube if you resize
Remember to save often
Step 1
New image 600 X 300, apply MuRa's Meister Cloud with the Light and BG white and the FG blue
I used #abc0e, name this sky. new layer and open up your Picture Tube Tool find Dirt colourist this to look like sand.
Name this sand. see my tag for Ref: or use my background I made HERE
Step 2
New layer, open up your Picture Tube Tool and find water.
Make a line of water, in middle of image, see my tag again for ref:
Resize the water as you do not want it to big.
New layer Picture Tube Tool and find Cloud, place it with you want it.
Step 3
Copy and paste your tube place her where you wish.
Add any establishments you want to.
If you use same kit as me you will have to re-size them all by about 30% depends where you place them.
I rotated the Surf board by 30% left, the tree I already had,
I used the word art in the kit and changed the white to transparent.
Give all your embellishments a drop shadow.
Shift D this is for your AV.
Add your name and copyright, and give your name a drop shadow
Step 4
Close all layers off apart from the water, new layer move it down below the water layer.
Copy merge and take to AS , paste as a new image.
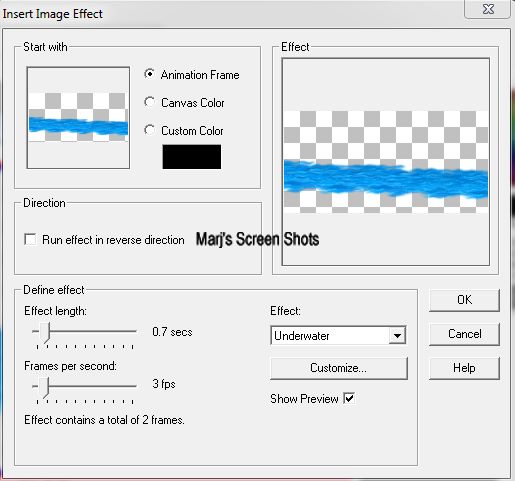
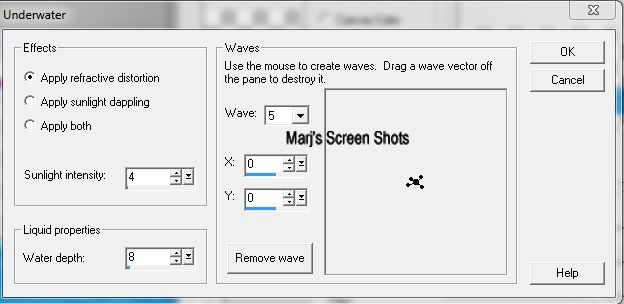
Apply Insert Image Effect, Underwater see shot 1,
Click on Customize and use settings in shot 2, this will make three frames.
Edit All and set the frame animations at 50.
Shot 1
This tutorial is my own creation and any resemblance to any other tutorial, is purely coincidental.
Please do not copy and use as your own work.
If you wish to translate please email me
It’s assumed that you have working knowledge on how to use filters/plugins.
This tutorial is written using P.S.P 16 but it can also be done in other versions
Animation Shop I will Ref to this as A.S
Filter MuRa's Meister Cloud
Tube of choice- I used Psyco Jimi you can get his work here http://www.mytubedart.com/catalog.php
Scrap kit of choice I used one Jaelop Designs called Summer Vacations here http://jaelop.blogspot.com/
Font of choice I used American Purpose
Please remember to Adjust and Sharpen your Tube if you resize
Remember to save often
Step 1
New image 600 X 300, apply MuRa's Meister Cloud with the Light and BG white and the FG blue
I used #abc0e, name this sky. new layer and open up your Picture Tube Tool find Dirt colourist this to look like sand.
Name this sand. see my tag for Ref: or use my background I made HERE
Step 2
New layer, open up your Picture Tube Tool and find water.
Make a line of water, in middle of image, see my tag again for ref:
Resize the water as you do not want it to big.
New layer Picture Tube Tool and find Cloud, place it with you want it.
Step 3
Copy and paste your tube place her where you wish.
Add any establishments you want to.
If you use same kit as me you will have to re-size them all by about 30% depends where you place them.
I rotated the Surf board by 30% left, the tree I already had,
I used the word art in the kit and changed the white to transparent.
Give all your embellishments a drop shadow.
Shift D this is for your AV.
Add your name and copyright, and give your name a drop shadow
Step 4
Close all layers off apart from the water, new layer move it down below the water layer.
Copy merge and take to AS , paste as a new image.
Apply Insert Image Effect, Underwater see shot 1,
Click on Customize and use settings in shot 2, this will make three frames.
Edit All and set the frame animations at 50.
Shot 1
Shot 1
|
Shot 2
|
Step 5
Keep the water layer open, open up the sand and sky layers, copy merge and take to AS.
Paste as a new image make three frames, by Edit All Duplicate Selected.
Active the water layer frame Edit All, Propagate.
Active the image you just made and paste this on to the water layer.
Step 6Back to P.S.P close off your open layers and open all the rest up. Copy merge and take over to AS.
Paste as a new image, make three frames. Edit All Duplicate Selected active the original image.
Edit All, Propagate active the image you just made and paste this on to the water layer.
See my tag for ref: save as a GIF
Step 7
Back to P.S.P open up the image you put to one side and crop by 150 X 150 using the part you wish.
If you use any part of your tube PLEASE remember to add your copyright
Hope you enjoy my tutorial.
Any problems please feel free to email me at [email protected]
Please remember this is just a guide.
I would love to see any work you have made using my tutorials
And with your permission show them on my site
Marj
Written 2nd May 2014
