Thanks Giving Treat
This tutorial is my own creation and any resemblance to any other tutorial,
is purely coincidental.
Please do not copy as use as your own work
If you wish to translate please email me
It’s assumed that you have working knowledge on how to use filters/plugins.
This tutorial is written using PSP 9 but it can also be done in other versions
Animation Shop I will refer to this as AS
Tube of choice- I using the work of Elias Chatzoudis,
I brought my tube when he was at PTE but he has his own site now here
http://www.eliasartshop.com/index.php
Filter MuRa's Meister Copies
Embellishments of choice or Animations of choice
Drop Shadow I used was H & V 4Opacity 40 Blur 5
Font of choice I used Segoe Print
Lets begin
Remember to save often
Step 1.
Open a image 600 x 300, copy and paste your tube,
apply MuRa's Mester Copies wall paper rotate,
I made the number 23 as wanted it to fill my image, apply Adjust Motion Blur,
angle 90 and strength 100, click OK, still working on this layer,
effects, Artistic Chrome, Smooth crimson,
Flaws 1 Brightness 30 and colour #702c2c,
Effects Edge Effectc Enhance, name this background
Step 2
Take your preset shape, chose rectangle and draw one,
(foreground null, back ground of choice, I used #f6ede3),
from one side to other, convert to Raster Layer,
and move down, see my tag for ref, give this a drop shadow,
New raser layer fill with the same colour as your bar,
Selection, Select all, Modify, contact by six, select none,
Name this border, give it the same dropshadow.
Step 3
Copy and paste your tube, resize if necessary, move the the right hand side,
give your tube the same drop shadow,
crop your image, shift D for your AV close for now
Step 4
Add a saying, or use the one I have used, position this where it lots best,
I wanted it to stand out, so did Selection,
Select all, Float, defloat, Modify Expand by 2,
add a new raster layer, and fill with a light colour, select none,
and move the light layer under the dark layer, merge down,
Add your copyright and name
Step 5
Open AS, find the animation you are going to use,
back to PSP, copy merge your image,
and take over to AS paste as a new image,
and make as many frames as your animation had, mine had four frames,
working on this image, Edit Propagate Paste,
do the same with your animation, take this and place it on the Bar,
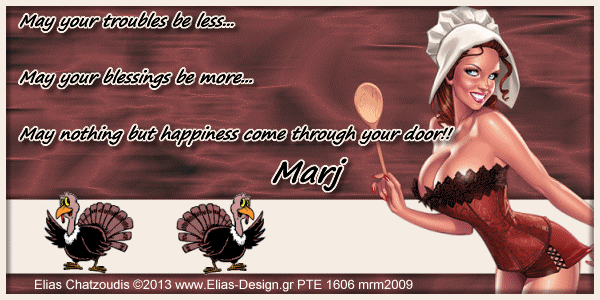
see my image for ref:, when happy save
Step 6
Back to PSP, open up the image you put to one side, and crop 150 X 150,
new raster layer fill with the same colour as your bar,
Selections, Select all, Modify, contact by six,
select none, give it the same drop shadow.
If you use any part of your tube PLEASE remember to add your copyright,
I just added the animaton to my AV
Hope you enjoyed my tutorial, I would love to see anything you make,
and would like to add them to my site, with your permission
and questions you can email me at [email protected]
Marj
Written on 12th October 2013
is purely coincidental.
Please do not copy as use as your own work
If you wish to translate please email me
It’s assumed that you have working knowledge on how to use filters/plugins.
This tutorial is written using PSP 9 but it can also be done in other versions
Animation Shop I will refer to this as AS
Tube of choice- I using the work of Elias Chatzoudis,
I brought my tube when he was at PTE but he has his own site now here
http://www.eliasartshop.com/index.php
Filter MuRa's Meister Copies
Embellishments of choice or Animations of choice
Drop Shadow I used was H & V 4Opacity 40 Blur 5
Font of choice I used Segoe Print
Lets begin
Remember to save often
Step 1.
Open a image 600 x 300, copy and paste your tube,
apply MuRa's Mester Copies wall paper rotate,
I made the number 23 as wanted it to fill my image, apply Adjust Motion Blur,
angle 90 and strength 100, click OK, still working on this layer,
effects, Artistic Chrome, Smooth crimson,
Flaws 1 Brightness 30 and colour #702c2c,
Effects Edge Effectc Enhance, name this background
Step 2
Take your preset shape, chose rectangle and draw one,
(foreground null, back ground of choice, I used #f6ede3),
from one side to other, convert to Raster Layer,
and move down, see my tag for ref, give this a drop shadow,
New raser layer fill with the same colour as your bar,
Selection, Select all, Modify, contact by six, select none,
Name this border, give it the same dropshadow.
Step 3
Copy and paste your tube, resize if necessary, move the the right hand side,
give your tube the same drop shadow,
crop your image, shift D for your AV close for now
Step 4
Add a saying, or use the one I have used, position this where it lots best,
I wanted it to stand out, so did Selection,
Select all, Float, defloat, Modify Expand by 2,
add a new raster layer, and fill with a light colour, select none,
and move the light layer under the dark layer, merge down,
Add your copyright and name
Step 5
Open AS, find the animation you are going to use,
back to PSP, copy merge your image,
and take over to AS paste as a new image,
and make as many frames as your animation had, mine had four frames,
working on this image, Edit Propagate Paste,
do the same with your animation, take this and place it on the Bar,
see my image for ref:, when happy save
Step 6
Back to PSP, open up the image you put to one side, and crop 150 X 150,
new raster layer fill with the same colour as your bar,
Selections, Select all, Modify, contact by six,
select none, give it the same drop shadow.
If you use any part of your tube PLEASE remember to add your copyright,
I just added the animaton to my AV
Hope you enjoyed my tutorial, I would love to see anything you make,
and would like to add them to my site, with your permission
and questions you can email me at [email protected]
Marj
Written on 12th October 2013
