Blonde Tassels
This tutorial is my own creation and any resemblance to any other tutorial, is purely coincidental.
Please do not copy and use as your own work.
If you wish to translate please email me
It’s assumed that you have working knowledge on how to use filters/plugins.
This tutorial is written using P.S.P. 16 but it can also be done in other versions
Animation Shop I will Ref to this as A.S
Filter Cybia Screenworks Grid Layout
Filter Transparency Eliminate Black
Filter Xero Clarity
Filter MuRa's Meister Perspective Tiling
Tube of choice- I used two Pinup Toons
I brought mine when they were sold at CILM but you can get them all here now
http://www.cdoestore.com/
Three masks of choice I use one of mine HERE
Crealine here http://line060.vefblog.net/cat15/
2Bits here http://2bitscraps.blogspot.no/search/label/Mask 2bits is also Sharlimar
Font I used Quigley Wiggly
Please remember to Adjust and Sharpen your Tube if you resize
Remember to save often as this one has a lot to it
Step 1
New image 600 X 300, use a Sun burst gradient. See shot 1 for the settings. Duplicate, working on the duplicate.
Apply Effects, Image Seamless Tilling, settings shot 2.
Cybia Screenworks Grid Layout.
Transparency Eliminate Black.
Effects Art Media Brush Stokes, colour Black settings see shot 3
Merge all flatten
Apply Effects Emboss 3

Shot 1
|
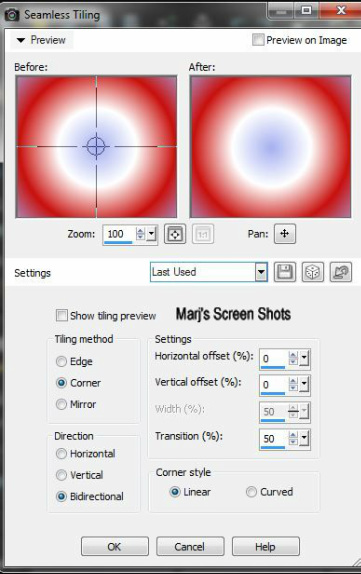
Shot 2
|

Shot 3
|
Step 2
New raster layer fill with white.
Find my mask Hump1
Source luminance and Invert mask ticked merge group.
Apply Effects Emboss 3, repeat Emboss
Apply Effects, Image Seamless Tilling, using the same settings you used above.
Apply a drop shadow I used H & V 2 Opacity 50 Blur 15 colour black.
Step 3
New raster layer fill with white, apply Crealine mask. merge group.
I duplicated this layer as it did not stand out Apply Emboss repeat.
Effects Image Effects Seamless Tilling using the same settings as shot 2.
Step 4
New raster layer fill with a light colour, I used #dfe3f5
Find your mask 2Bit 25, apply Emboss, Xero Clarity settings Clarity 128.
This will make it stand out
Step 5
With your selection tool, hold Shift down and very carefully go round the Rectangles on your mask layer.
Promote to layer Select none.
Adjust Add Noise, settings Uniform and Monochrome ticked and Noise set at 45
Active your 2 bit mask layer and give it a drop shadow H & V 4Opacity 50 Blur 5 colour black.
Repeat but do the H & V -4
Step 6
Active your back ground layer and bring to top of your image.
Select, Modify Contact by 6, hit delete, select none.
Give it a drop shadow, H & V 4 Opacity 50 Blur 5 colour black. Repeart but do the H & V -4
Shift D this is for your AV, put to one side.
Add your Artist copyright and your name, give your name a drop shadow.
If you do not wish to animate save now
Step 7
***We want her eyes to blink, so what we do is
Active the left hand tube layer, and take your free hand section tool click on point to point,
and very very carefully, make a section of her eyes.
New layer and fill with black, select none see shot 4 for how it should look.
Name this eyes, close this layer for now
Shot 4

Step 8
Copy merge and take over to A.S paste as a new image.
Back to P.S.P, open up the eyes layer, copy merge and take over to A.S,
and paste after current frame, back to P.S.P, close the eyes layer off, copy merge and take over to A.S.
And paste after current frame, set frames one and two at 5 and frame three at 300.
When happy save as a G.I.F ****
Step 9
Open up the image you closed earlier and crop it,by 150 X150.
using her eyes as your A.V. repeat from *** to *** if you wish to animate it
PLEASE remember to add your Artists copyright.
Hope you enjoy my tutorial.
Any problems please feel free to email me at [email protected]
Please remember this is just a guide.
I would love to see any work you have made using my tutorials
And with your permission show them on my site
Marj
Written 7th June 2014
