Caroline
My Selections HERE
Unzip and put in your P.S.P. Selection
This tutorial is my own creation and any resemblance to any other tutorial, is purely coincidental.
Please do not copy and use as your own work.
If you wish to translate please email me
It’s assumed that you have working knowledge on how to use filters/plugins.
This tutorial is written using PSP 16 but it can also be done in other versions
Filter Filters Unlimited 2.0
Filter Simple
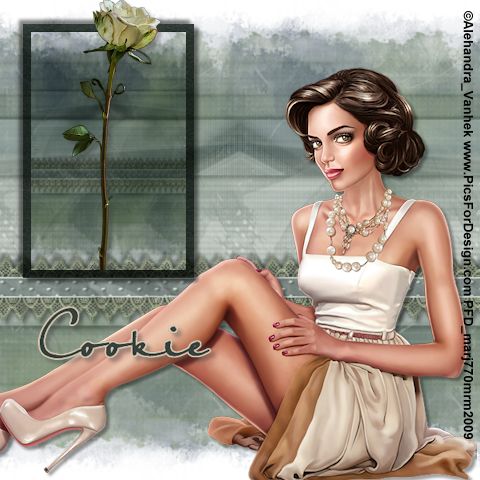
Tube of choice- I used Aleandra Vanhek
You can get her wonderful work here www.PicsForDesign.com
Mask of choice I used one by Beck no 22.
A flower I had, so can not share.
The Ribbon I have put at bottom of Tutorial
Background of choice, sorry can not share.
Font of choice I used Petra Script
Please remember to Adjust and Sharpen your Tube if you resize
Remember to save often
Step 1
New image 600 X 600, fill with white, open up the mask you are going to use.
Copy and paste as a new layer, Effects Image Effects seamless Tiling.
Settings Corner, Horizontal ticked, Horizontal offset 0 Transitions 25.
You will see this makes the mask go from side to side.
Effects Edge Effects Enhance.
Step 2
New raster layer, Load Selection Marj_Se_ #109.
Find the background you are going to use, copy and paste onto selection.
Apply Filter Simple Top Left hand mirror, select none, set the Blend of this to Luminance ( L) and lower it to 52.
Copy merge and make a new image, put to one side for now.
Step 3
Return to your work image, new layer find my selection Marj_Sel#110.
On the settings tick move to left hand corner, fill with #37413b, keep selected.
And apply Filters Unlimited 2.0 Paper Texture, settings Intensity 67 Lightness 87.
Sections, Modify Contact by 10, find the image you put to one side and copy and paste into section.
Mode multiply, KEEP selected, Effects Edge Effects Enhance, select none.
Give it a drop shadow, name this small frame.
Move it down a bit see my tag for ref: re-size by 80% .
Step 4
Working on the small frame, take your selection tool set Rectangle and very carefully go round the inside of it.
Section Invert find the flower you are going to use, copy and paste in the small frame.
You want the rose to coming out of the top, so I duplicate, on the original hit delete.
On the duplicate take your erase brush and take away the bottom of rose stalk
Select none give it a drop shadow
Step
Copy and paste your ribbon, place it down a bit.
Give it the same drop shadow, see my tag again for ref:.
Copy and paste your tube as a new layer.
Give it a drop shadow. Add your copyright and name.
Give your name a drop shadow
Hope you enjoy my tutorial.
Any problems please feel free to email me at [email protected]
Please remember this is just a guide.
I would love to see any work you have made using my tutorials
And with your permission show them on my site
Marj
Written 24th May 2014
Unzip and put in your P.S.P. Selection
This tutorial is my own creation and any resemblance to any other tutorial, is purely coincidental.
Please do not copy and use as your own work.
If you wish to translate please email me
It’s assumed that you have working knowledge on how to use filters/plugins.
This tutorial is written using PSP 16 but it can also be done in other versions
Filter Filters Unlimited 2.0
Filter Simple
Tube of choice- I used Aleandra Vanhek
You can get her wonderful work here www.PicsForDesign.com
Mask of choice I used one by Beck no 22.
A flower I had, so can not share.
The Ribbon I have put at bottom of Tutorial
Background of choice, sorry can not share.
Font of choice I used Petra Script
Please remember to Adjust and Sharpen your Tube if you resize
Remember to save often
Step 1
New image 600 X 600, fill with white, open up the mask you are going to use.
Copy and paste as a new layer, Effects Image Effects seamless Tiling.
Settings Corner, Horizontal ticked, Horizontal offset 0 Transitions 25.
You will see this makes the mask go from side to side.
Effects Edge Effects Enhance.
Step 2
New raster layer, Load Selection Marj_Se_ #109.
Find the background you are going to use, copy and paste onto selection.
Apply Filter Simple Top Left hand mirror, select none, set the Blend of this to Luminance ( L) and lower it to 52.
Copy merge and make a new image, put to one side for now.
Step 3
Return to your work image, new layer find my selection Marj_Sel#110.
On the settings tick move to left hand corner, fill with #37413b, keep selected.
And apply Filters Unlimited 2.0 Paper Texture, settings Intensity 67 Lightness 87.
Sections, Modify Contact by 10, find the image you put to one side and copy and paste into section.
Mode multiply, KEEP selected, Effects Edge Effects Enhance, select none.
Give it a drop shadow, name this small frame.
Move it down a bit see my tag for ref: re-size by 80% .
Step 4
Working on the small frame, take your selection tool set Rectangle and very carefully go round the inside of it.
Section Invert find the flower you are going to use, copy and paste in the small frame.
You want the rose to coming out of the top, so I duplicate, on the original hit delete.
On the duplicate take your erase brush and take away the bottom of rose stalk
Select none give it a drop shadow
Step
Copy and paste your ribbon, place it down a bit.
Give it the same drop shadow, see my tag again for ref:.
Copy and paste your tube as a new layer.
Give it a drop shadow. Add your copyright and name.
Give your name a drop shadow
Hope you enjoy my tutorial.
Any problems please feel free to email me at [email protected]
Please remember this is just a guide.
I would love to see any work you have made using my tutorials
And with your permission show them on my site
Marj
Written 24th May 2014

