Stripe Cylinder


This tutorial is written using PSP 9 but it can also be done in other versions.
This tutorial is my own creation and any resemblence to any other tutorial, is purely conicidental.
Please do not copy and use as your own work
~~~~~~~~~
What we will need for this tutorial:-
Paint Shop Pro (PSP) any version mine was done in PSP9
Tube of choice- I using the great work of Elias Chatzoudis YOU must have a licence to use his work,
He is now selling at PSP Tubes Emporium http://psptubesemporium.com/index.php?p=home
I brought mine when he was at MyPSPTubes
Filter MuRa's Seamless
Font of choice I used Pegasus
Remember to save often
~~~~~~~~~
Lets get started
~~~~~~~~~
Step 1
Open a new image 600 x 250 flood fill with a light colour from your tube
~~~~~~~~~
Step 2
Copy and paste your tube resize if you need to, move to the left, duplicate mirror, merge down
~~~~~~~~~
Step 3
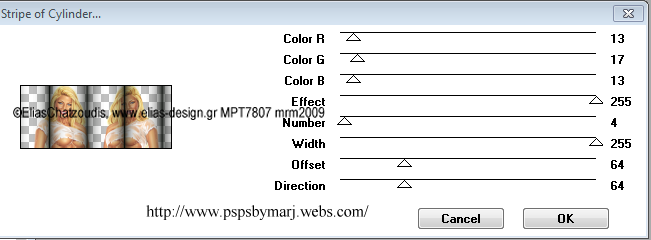
Filter MuRa's Seamless Stripe of Cylinder Shot 1 You should have some thing like this
This tutorial is my own creation and any resemblence to any other tutorial, is purely conicidental.
Please do not copy and use as your own work
~~~~~~~~~
What we will need for this tutorial:-
Paint Shop Pro (PSP) any version mine was done in PSP9
Tube of choice- I using the great work of Elias Chatzoudis YOU must have a licence to use his work,
He is now selling at PSP Tubes Emporium http://psptubesemporium.com/index.php?p=home
I brought mine when he was at MyPSPTubes
Filter MuRa's Seamless
Font of choice I used Pegasus
Remember to save often
~~~~~~~~~
Lets get started
~~~~~~~~~
Step 1
Open a new image 600 x 250 flood fill with a light colour from your tube
~~~~~~~~~
Step 2
Copy and paste your tube resize if you need to, move to the left, duplicate mirror, merge down
~~~~~~~~~
Step 3
Filter MuRa's Seamless Stripe of Cylinder Shot 1 You should have some thing like this
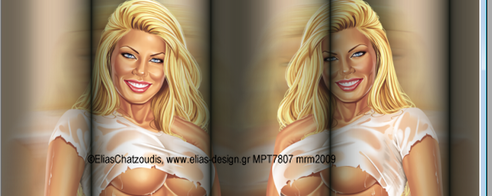
Duplicate and still on this layer Adjust Gaussian blur 3, then soft light
On the original layer Adjust Motion blur Strength 100 Angle 95, duplicate, mirror, merge down and it should look like this
as you want her to look as if she is moving, Shot 2
On the original layer Adjust Motion blur Strength 100 Angle 95, duplicate, mirror, merge down and it should look like this
as you want her to look as if she is moving, Shot 2
Still on this layer Effects Edge Effects Enhance
~~~~~~~~~
Step 4
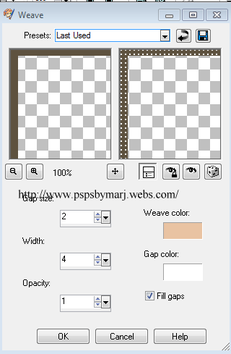
Go to top of layers add new layer and fill with dark colour from tube, select all, modify contact by 10 hit delete,
deselect, you can leave border as it is or do like I did, by doing Texture Effects
Weave Gap 2 Width 4 Opacity 1 and fill gaps, drop shadow Shot 3
~~~~~~~~~
Step 4
Go to top of layers add new layer and fill with dark colour from tube, select all, modify contact by 10 hit delete,
deselect, you can leave border as it is or do like I did, by doing Texture Effects
Weave Gap 2 Width 4 Opacity 1 and fill gaps, drop shadow Shot 3
~~~~~~~~~
Add your name and your copyright licence
~~~~~~~~~
Step 5
For your AV crop the part you want to use, add a new Raster layer and repeat step 4,
but contact by 8 else the border will be to big
~~~~~~~~~
Hope you enjoyed my tut
Marj
Would love to see your results
Written by Marj 19th October 2011
Add your name and your copyright licence
~~~~~~~~~
Step 5
For your AV crop the part you want to use, add a new Raster layer and repeat step 4,
but contact by 8 else the border will be to big
~~~~~~~~~
Hope you enjoyed my tut
Marj
Would love to see your results
Written by Marj 19th October 2011
