PussyCat
This tutorial is my own creation and any resemblance to any other tutorial, is purely coincidental.
Please do not copy as use as your own work.
And please do not translate, with out my permisson
This tutorial is written using PSP 9 but it can also be done in other versions
Animation Shop I will ref to this as AS
Filter MuRa's Seemless MirrorDiagonal, Shift at Zigzag
Animation I used one from
Heather Animations here http://www.heathersanimations.com/
Tube of choice- A close up and normal size tube.
I using the great work of Gina King.
Please do not use unless you a licence you can get her work here
http://psptubesemporium.com/index.php?p=home
Background of choice I light colour from your Tube, I used #f7e6d3
Drop Shadow I used H & V 3 Opacity 40 Blur 10
Font of choice I used Boulder
Lets begin
Remember to save often
Step 1.
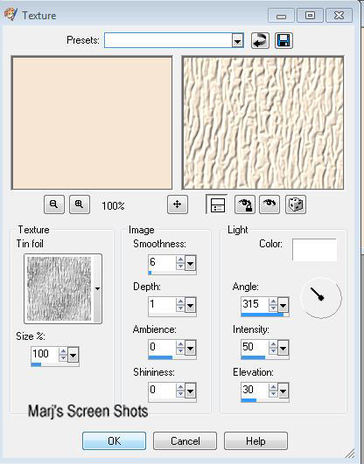
Open a image 600 x 250 fill with your light colour from your tube,
name this background, and apply Effects Paper Weave Textures shot 1.
Please do not copy as use as your own work.
And please do not translate, with out my permisson
This tutorial is written using PSP 9 but it can also be done in other versions
Animation Shop I will ref to this as AS
Filter MuRa's Seemless MirrorDiagonal, Shift at Zigzag
Animation I used one from
Heather Animations here http://www.heathersanimations.com/
Tube of choice- A close up and normal size tube.
I using the great work of Gina King.
Please do not use unless you a licence you can get her work here
http://psptubesemporium.com/index.php?p=home
Background of choice I light colour from your Tube, I used #f7e6d3
Drop Shadow I used H & V 3 Opacity 40 Blur 10
Font of choice I used Boulder
Lets begin
Remember to save often
Step 1.
Open a image 600 x 250 fill with your light colour from your tube,
name this background, and apply Effects Paper Weave Textures shot 1.
Step 2.
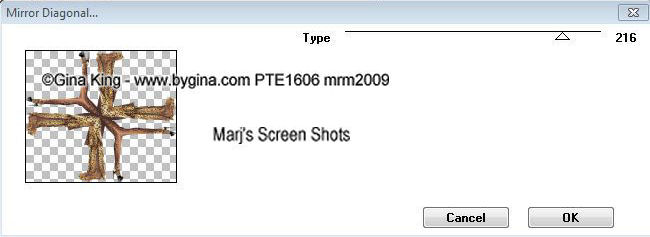
Copy and paste your smaller size Tube.apply Seemless Mirror Diagonal, Shot 2
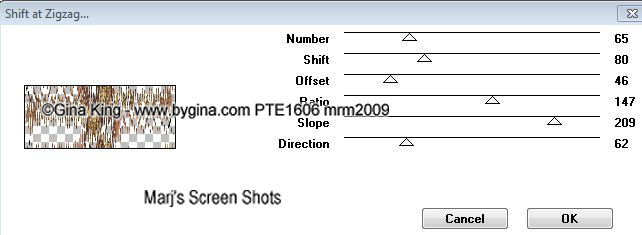
Still working on this layer apply Shift at Zigzag shot 3, dulicate,
Image Flip and merge down apply Multipy, lower the opacity to 50, merge visable name this background
Shot 2
Copy and paste your smaller size Tube.apply Seemless Mirror Diagonal, Shot 2
Still working on this layer apply Shift at Zigzag shot 3, dulicate,
Image Flip and merge down apply Multipy, lower the opacity to 50, merge visable name this background
Shot 2
Step 3.
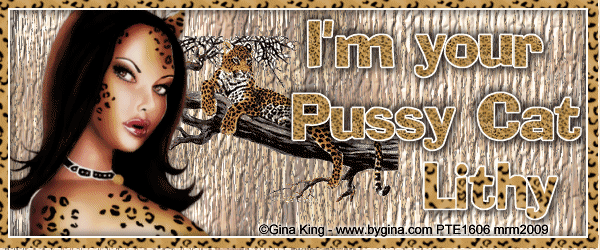
Copy and paste your close up of tube, positon where you like
I put mine on the left had side, add a drop shadow.
Step 4
Add a saying that matches your tube, or use mine, new raster layer fill with white Select All
Modify by 12 hit delete, deselect,
New raster layer, fill with a patten I had a Leopard one in my PSP so used that,
Select All Modify by 10 hit delete, deselect, merge down,
Add a drop shadow I used H & V 3 Opacity 40 Blur 10, then repeated it but did H & V -3.
Shift and D, this
is for your AV, put to one side for now, add your copyright and name
Step 5
Open up AS, copy your background and take over to AS, paste as a new animation,
and make as many frames as the animation that you are going to use, mine had 4 frames,
working on your background frames layers, Edit Select all Propagate, do the same with your
animation, and take to the Animation frame, and place where you want it,
Back toPSP, close the background layer, and copy merged,
Take over to AS and repeat the above step, if happy save as a Gif
Step 6
Open up the image
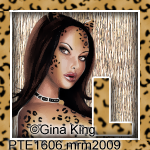
you put to one side and crop 150 x 150 for your AV
IF you use any part of tube remember to add copyright, I used the smaller tube for the AV
Hope you enjoyed my tut
Marj
Written 2nd August 2012
Copy and paste your close up of tube, positon where you like
I put mine on the left had side, add a drop shadow.
Step 4
Add a saying that matches your tube, or use mine, new raster layer fill with white Select All
Modify by 12 hit delete, deselect,
New raster layer, fill with a patten I had a Leopard one in my PSP so used that,
Select All Modify by 10 hit delete, deselect, merge down,
Add a drop shadow I used H & V 3 Opacity 40 Blur 10, then repeated it but did H & V -3.
Shift and D, this
is for your AV, put to one side for now, add your copyright and name
Step 5
Open up AS, copy your background and take over to AS, paste as a new animation,
and make as many frames as the animation that you are going to use, mine had 4 frames,
working on your background frames layers, Edit Select all Propagate, do the same with your
animation, and take to the Animation frame, and place where you want it,
Back toPSP, close the background layer, and copy merged,
Take over to AS and repeat the above step, if happy save as a Gif
Step 6
Open up the image
you put to one side and crop 150 x 150 for your AV
IF you use any part of tube remember to add copyright, I used the smaller tube for the AV
Hope you enjoyed my tut
Marj
Written 2nd August 2012
