Videowand


This tutorial is written using PSP 9 but it can also be done in other versions.
This tutorial is my own creation and any resemblence to any other tutorial, is purely conicidental.
Please do not copy and use as your own
What we will need for this tutorial:-
Paint Shop Pro (PSP) any version mine was done in PSP9
Filter Kiwi Videowand
Tube of choice- I using Anthony Guerra one that has a close up if possible
I brought mine when he was with CILM
Please do not use unless you have a license
Anthony is no longer selling Tubes anywhere.
Font of choice I used Calligrapher
Drop shadow H V 4 Opacity 40 Blur 4
Save offten
Lets get started
~~~~~~
Step 1
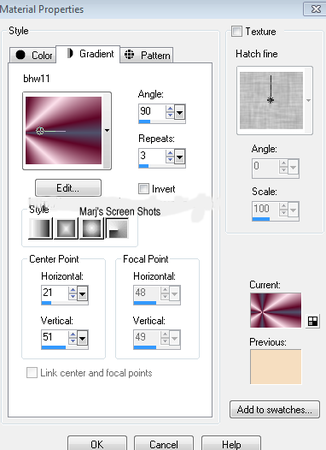
Open a new image 600 x 250 flood fill with a gradient made from a light colour and dark colour from tube
Liner Angle 90 repeats 3 invert unchecked, shot 1
This tutorial is my own creation and any resemblence to any other tutorial, is purely conicidental.
Please do not copy and use as your own
What we will need for this tutorial:-
Paint Shop Pro (PSP) any version mine was done in PSP9
Filter Kiwi Videowand
Tube of choice- I using Anthony Guerra one that has a close up if possible
I brought mine when he was with CILM
Please do not use unless you have a license
Anthony is no longer selling Tubes anywhere.
Font of choice I used Calligrapher
Drop shadow H V 4 Opacity 40 Blur 4
Save offten
Lets get started
~~~~~~
Step 1
Open a new image 600 x 250 flood fill with a gradient made from a light colour and dark colour from tube
Liner Angle 90 repeats 3 invert unchecked, shot 1
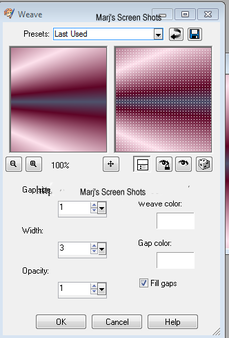
keep this layer active effects weave shot 2
~~~~~~
Step 2
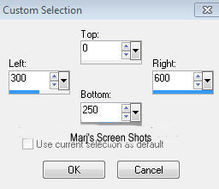
New raster layer section tool sees shot 3, fill with your light colour select none
Step 2
New raster layer section tool sees shot 3, fill with your light colour select none
~~~~~~
Step 3
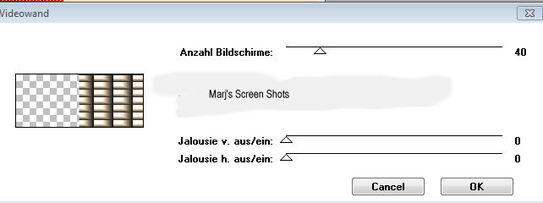
Still on this layer appy Kiwi Videowand shot 4,
Effects, Edge effects enhance.rename this layer Videowand
Step 3
Still on this layer appy Kiwi Videowand shot 4,
Effects, Edge effects enhance.rename this layer Videowand
~~~~~~
Step 4
Copy and paste your close up of tube,drop shadow move over to the right, on top of the Videowand layer,
I wanted her eyes to show, you do not have one with a close up resize your tube
BUT remember to sharpen the tube, lower this layer opacity to about 36,
but do what you think is best for your tube
~~~~~~
Step 5
Copy and paste tube image mirror and move to the left see my tag for ref: drop shadow.
Crop your tag at this stage
~~~~~~
Step 6
New raster layer fill with your dark colour, select all. Modify, contact by 4 px,
hit delete, select none,still on this layer drop shadow
~~~~~~
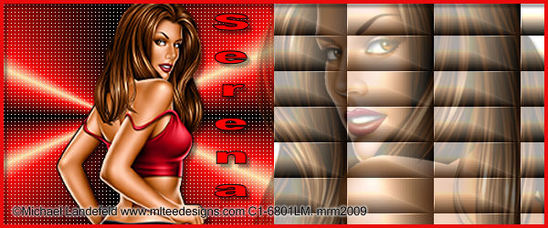
Step 7
A.V
Crop the piece of tag you want to use see mine and repeat step 7
Add your copy write and name.
~~~~~~
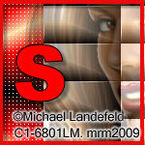
The 2nd set I made I used the wonderful art work of Michael Landerfeld when he was still at CLIM
Michael Landefeld’s tubes are now available at CreativeDesignOutlet.
here http://www.cdoestore.com/
Hope you enjoy my tut
Marj
Step 4
Copy and paste your close up of tube,drop shadow move over to the right, on top of the Videowand layer,
I wanted her eyes to show, you do not have one with a close up resize your tube
BUT remember to sharpen the tube, lower this layer opacity to about 36,
but do what you think is best for your tube
~~~~~~
Step 5
Copy and paste tube image mirror and move to the left see my tag for ref: drop shadow.
Crop your tag at this stage
~~~~~~
Step 6
New raster layer fill with your dark colour, select all. Modify, contact by 4 px,
hit delete, select none,still on this layer drop shadow
~~~~~~
Step 7
A.V
Crop the piece of tag you want to use see mine and repeat step 7
Add your copy write and name.
~~~~~~
The 2nd set I made I used the wonderful art work of Michael Landerfeld when he was still at CLIM
Michael Landefeld’s tubes are now available at CreativeDesignOutlet.
here http://www.cdoestore.com/
Hope you enjoy my tut
Marj
Written by Marj 26th Jan 2012
