MaryMae
This tutorial is my own creation and any resemblance to any other tutorial, is purely coincidental.
Please do not copy as use as your own work, please do not translate with out my permission,
If you wish to translate please email me
This tutorial is written using PSP 9 but it can also be done in other versions
Animation Shop
Filter Eye Candy Gradient Glow
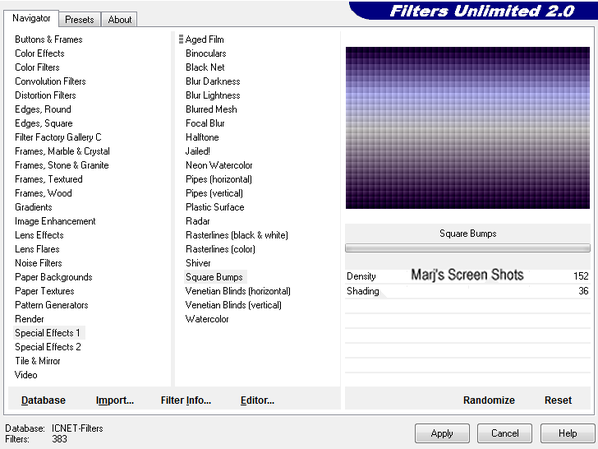
Filter Filter Unlimited 2.0 Special Effects Square Bumps
Tube of choice- I using the great work of Deacon Black I brought mine when he was with CILM but he is now with CDO
Please do not use unless you have a license
This can be purchased at CDO here http://cdoestore.com/
Drop Shadow I used was H & V 3 Opacity 50 Blur 5
Font of choice I used Bix Antique Script
Lets begin
Remember to save often
Step 1.
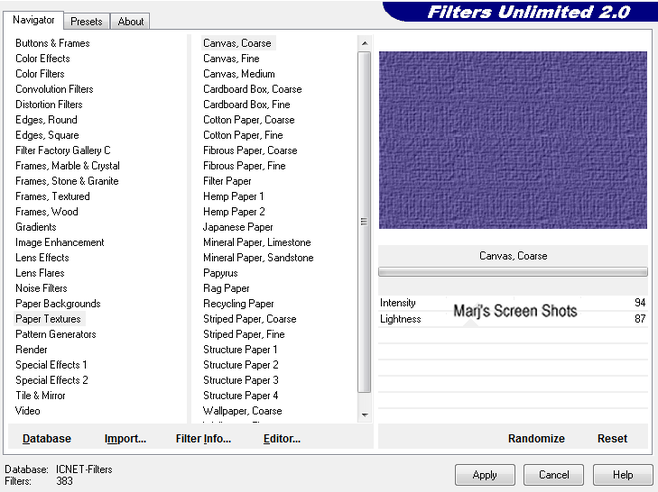
Open a image 600 x 400 fill with a colour from your tube, name this background,
and apply Unlimited 2.0 Special Effects Paper Textures shot 1
Please do not copy as use as your own work, please do not translate with out my permission,
If you wish to translate please email me
This tutorial is written using PSP 9 but it can also be done in other versions
Animation Shop
Filter Eye Candy Gradient Glow
Filter Filter Unlimited 2.0 Special Effects Square Bumps
Tube of choice- I using the great work of Deacon Black I brought mine when he was with CILM but he is now with CDO
Please do not use unless you have a license
This can be purchased at CDO here http://cdoestore.com/
Drop Shadow I used was H & V 3 Opacity 50 Blur 5
Font of choice I used Bix Antique Script
Lets begin
Remember to save often
Step 1.
Open a image 600 x 400 fill with a colour from your tube, name this background,
and apply Unlimited 2.0 Special Effects Paper Textures shot 1
Step 2.
New raster layer fill with a gradient made from your back ground colour and a lighter one Liner, Angle and Repeats 0,
Name this curtains, and working on this layer apply Unlimited 2.0 Special Effects Square Bumps, shot 2,
Close off for now, active your background layer and apply Unlimited 2.0 Special Effects
Step 3
Copy and paste your tube resize if necessary, give it a drop shadow.
Step 4
New raster layer fill with the light colour from your tube,
Select All Modify ad Contact by 10, hit delete and apply the texture effects you applied on your back ground,
apply Eye Candy Gradient Glow width 3 and Pride apply again, and name this frame
Add your copyright and name, do Shift and D twice these are for your forum and AV
Step 5
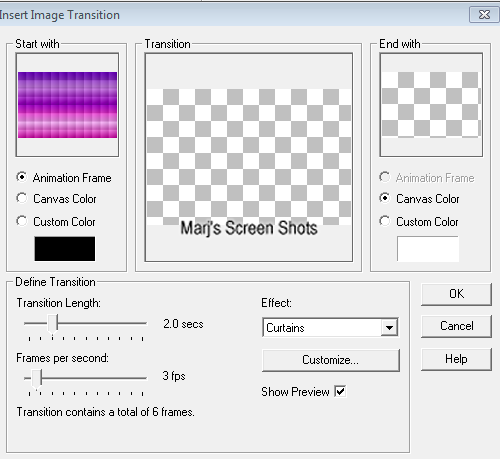
Open up Animation Shop, close off all layers apart from your curtain layer, take the curtain layer to AS
and apply, Insert Image Transition Curtains, this will give you 7 frames,
back to PSP close off all but your tube and back ground layer Copy merge and paste as a new animation.
make 7 frames,Shot 3
Copy and paste your tube resize if necessary, give it a drop shadow.
Step 4
New raster layer fill with the light colour from your tube,
Select All Modify ad Contact by 10, hit delete and apply the texture effects you applied on your back ground,
apply Eye Candy Gradient Glow width 3 and Pride apply again, and name this frame
Add your copyright and name, do Shift and D twice these are for your forum and AV
Step 5
Open up Animation Shop, close off all layers apart from your curtain layer, take the curtain layer to AS
and apply, Insert Image Transition Curtains, this will give you 7 frames,
back to PSP close off all but your tube and back ground layer Copy merge and paste as a new animation.
make 7 frames,Shot 3
Back to PSP close off all but your tube and back ground layer
Copy merge and paste as a new animation. make 7 frames,
Edit select all, propagate paste, do the same with the transition curtains you made,
and take the curtain frames and add it on top, of the animation you have just made
back to PSP close all layers, and open the frame,
take it over to AS and repeat the select all and propagate paste,
you need the frame layer etc. on top of the earlier animation,
Edit Select all REVERSE FRAMES
Step 6
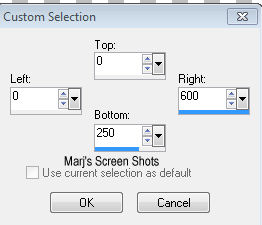
Back to PSP and open up one of the images you put to one side,
take your selection tool and make a select see shot 4
Crop to selection, you might have to move your tube around before you do this.
Shot 4
Copy merge and paste as a new animation. make 7 frames,
Edit select all, propagate paste, do the same with the transition curtains you made,
and take the curtain frames and add it on top, of the animation you have just made
back to PSP close all layers, and open the frame,
take it over to AS and repeat the select all and propagate paste,
you need the frame layer etc. on top of the earlier animation,
Edit Select all REVERSE FRAMES
Step 6
Back to PSP and open up one of the images you put to one side,
take your selection tool and make a select see shot 4
Crop to selection, you might have to move your tube around before you do this.
Shot 4
Step 7
Repeat step's 4 and 5 ,
now open up the other image and crop the piece of tag you wish to use, see my AV for ref:,
I used her face and repeat step 4, remember to add your copyright to your tag and AV,
Hope you enjoy me tut and questions feel free to email me at [email protected]
Marj
Written on 2nd June 2012
