Lace's

This tutorial is my own creation and any resemblance to any other tutorial, is purely coincidental.
Please do not copy as use as your own work
Please do not translate, if you wish to please email me
This tutorial is written using PSP 9 but it can also be done in other versions
Animation Shop
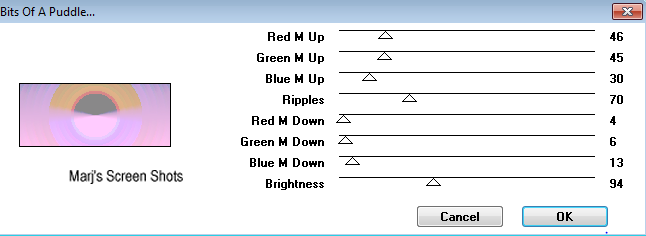
Filter Andrews Filter 56 Bits of Puddle
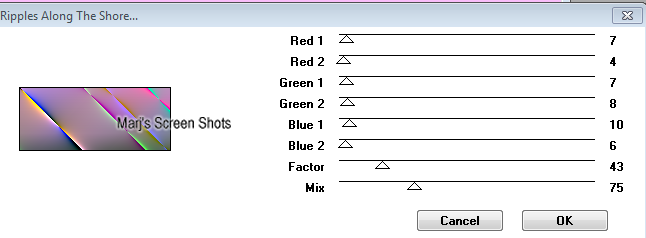
Filter Andrews Filter 61 Ripples along the shore
Filter Eye Candy 4000 Gradient Glow
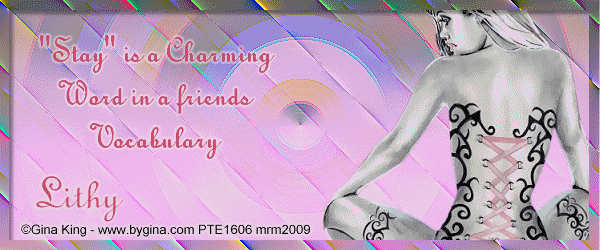
Tube of choice, I used Gina King
Please do not use unless you have a licence
You can get her work here http://psptubesemporium.com/index.php?p=home
Animation of choice I used Breakaway by Missy
Drop Shadow I used was H & V 4 Opacity 40 Blur 5
Font of choice I used Typo Upright BT
Lets begin
Remember to save often
Step 1
Open a image 600 x250 fill with a gradient made with two colours from your tube, one light and one medium,
liner angle and repeats 0, apply Andrews Filters 56 Bits of Puddle, shot 1,
Effects Edge Effect Enhance, rename Puddle, new raster layer, fill again with your gradient, image flip
and apply, Andrews Filter 61 Ripples along the shore,shot 2,
Effects Edge Effect Enhance, apply soft light rename Ripples
Shot 1 and 2
Please do not copy as use as your own work
Please do not translate, if you wish to please email me
This tutorial is written using PSP 9 but it can also be done in other versions
Animation Shop
Filter Andrews Filter 56 Bits of Puddle
Filter Andrews Filter 61 Ripples along the shore
Filter Eye Candy 4000 Gradient Glow
Tube of choice, I used Gina King
Please do not use unless you have a licence
You can get her work here http://psptubesemporium.com/index.php?p=home
Animation of choice I used Breakaway by Missy
Drop Shadow I used was H & V 4 Opacity 40 Blur 5
Font of choice I used Typo Upright BT
Lets begin
Remember to save often
Step 1
Open a image 600 x250 fill with a gradient made with two colours from your tube, one light and one medium,
liner angle and repeats 0, apply Andrews Filters 56 Bits of Puddle, shot 1,
Effects Edge Effect Enhance, rename Puddle, new raster layer, fill again with your gradient, image flip
and apply, Andrews Filter 61 Ripples along the shore,shot 2,
Effects Edge Effect Enhance, apply soft light rename Ripples
Shot 1 and 2
Step 2
Copy and paste your tube, resize if it needs it,
I resized mine by 80%, place on the side I placed mine on the right side, give it a drop shadow.
Step 3
Shift and D this is for your AV, put this to one side for now,
add your copyright and name, and a saying,
I gave the saying and name a gradient glow, Glow width 3, thin white
Step 4
New raster layer, fill with the same gradient, Select all Modify, Contact by 10,
Hit delete and deselect, apply Andrews Filter 61 Ripples along the shore, to this,
Give this the same drop shadow you used on your tube
Step 5
Open up Animation Shop, close all layers off apart from the Puddle and Ripples layers, copy merge,
Take over to AS and paste as a new animation, find the animation, you are going to use
and make the same amount of frames of your new image, mine had 30 frames,
then Edit and Propagate, your image, do this with the animation,
and take this over to the image you made, I placed mine on the left hand side of my tag, see mine for ref:,
back to PSP close off Puddle and Ripples layers, and open up all the rest, copy merge,
take over to AS and paste as a new animation, make the amount of frames you need and repeat
and do the same as you did earlier.
View and if happy save left the animation frames at 10
Step 6
Open the image you put to one side and crop it to 150 X 150. and repeat steps 4 and 5,
And please remember if you use any part of you tube to add your copyright info.
I hope you enjoyed my tut, if you have any questions please feel free to email me at [email protected]
Marj
Written 23rd May 2012
