Gypsy Lady
This tutorial is my own creation and any resemblance to any other tutorial, is purely coincidental.
Please do not copy and use as your own work.
If you wish to translate please email me
It’s assumed that you have working knowledge on how to use filters/plugins.
This tutorial is written using PSP 16 but it can also be done in other versions
Animation Shop I will Ref to this as AS
Filter VM Natural
Filter Unlimited 2.0
Tube of choice- I used a Tube by Alehandra Vanhek,
A new Artist for me.
You can get her work here www.PicsForDesign.com/
Sorry this tube can only be used by her fan Club
Font of choice I used Zamrud & Khatlisti and WishMF
I used dropshadow H & V 4 Opacity 40 Blur 5,00 then H & V -4,
on the frame as this made all the frame stand out
Please remember to Adjust and Sharpen your Tube if you resize
Remember to save often
For this Tutorial we are going to use a Preset Shape, that you should have in your P.S.P.
Step 1
New image 600 X 600 fill with a Liner gradient Angle and Repeats 0, of choice.
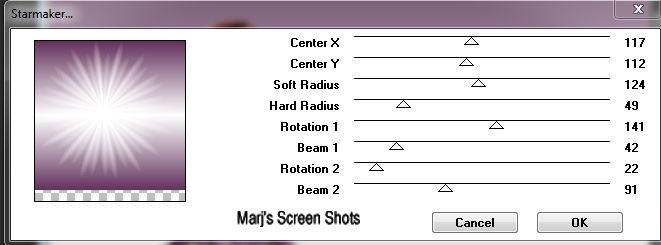
Name this background, duplicate. orking on this layer apply VM Natural Star maker, as shot 1, name this Star maker.
Shot 1
Please do not copy and use as your own work.
If you wish to translate please email me
It’s assumed that you have working knowledge on how to use filters/plugins.
This tutorial is written using PSP 16 but it can also be done in other versions
Animation Shop I will Ref to this as AS
Filter VM Natural
Filter Unlimited 2.0
Tube of choice- I used a Tube by Alehandra Vanhek,
A new Artist for me.
You can get her work here www.PicsForDesign.com/
Sorry this tube can only be used by her fan Club
Font of choice I used Zamrud & Khatlisti and WishMF
I used dropshadow H & V 4 Opacity 40 Blur 5,00 then H & V -4,
on the frame as this made all the frame stand out
Please remember to Adjust and Sharpen your Tube if you resize
Remember to save often
For this Tutorial we are going to use a Preset Shape, that you should have in your P.S.P.
Step 1
New image 600 X 600 fill with a Liner gradient Angle and Repeats 0, of choice.
Name this background, duplicate. orking on this layer apply VM Natural Star maker, as shot 1, name this Star maker.
Shot 1
Step 2
Take your Preset Shape tool and find one called Shape-10
(again if you do not have it am happy to zip it and send it to you ) mine came with my P.S.P.
Hold down your shift key, and draw the shape, you need it in the middle of your tag.
Objects. Align, center of canvas, convert to raster layer.
Take your magic wand and click on the large rectangle on the left hand side.
New layer, fill with a colour of choice, select non.
Apply Unlimited 2.0 Paper Textures Japanese Paper Default settings.
Name this Side panel, apply a dropshadow,
Now repeat with the rest of your frame you made.
Play around with colours and textures, to get a great frame, the possibles are endless.
Once you have made all your different colours you can delete the original frame you made.
The only other one I named was the square one.
Step 3
Copy and paste your tube put her on the right hand side.
Give it a drop shadow.
Add any embelishments you like I add a fan, and made it look as if she was holding it.
A vase, garland of flowers, and branch of flowers, give them all a dropshadow.
Step 4
Active your background layer and bring to the top of your image.
Select all Modify, Contact by 6, hit delete, give your border a drop shadow.
Add your copyright, name and a saying that fits your tube, give name and saying a dropshadow.
Step 5
Active the square frame, Adjust Add Noise, Random and Monochrome ticked and Noise 50.
Copy merge and take to AS, paste as a new image, back to P.S.P. Undo noise and set noise at 60.
Copy merge and take to AS, and paste after current frame. Save as a GIF
Hope you enjoy my tutorial.
Any problems please feel free to email me at [email protected]
Please remember this is just a guide.
I would love to see any work you have made using my tutorials
And with your permission show them on my site
Marj
Written 27th April 2014
