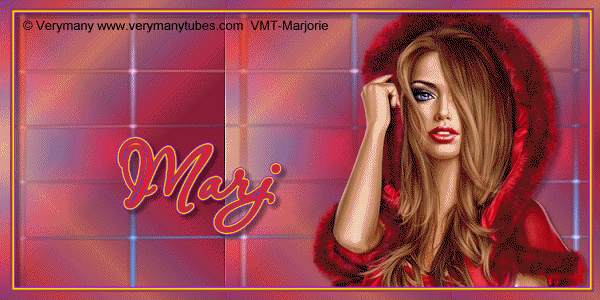
Red Riding Hood

This tutorial is my own creation and any resemblance to any other tutorial,
is purely coincidental.
Please do not copy, and use as your own work.
if you wish to translate please email me
It’s assumed that you have working knowledge on how to use filters/plugins.
This tutorial is written using PSP 9 but it can also be done in other versions
Animation of choice, sorry I can not share but there are loads out there you can use
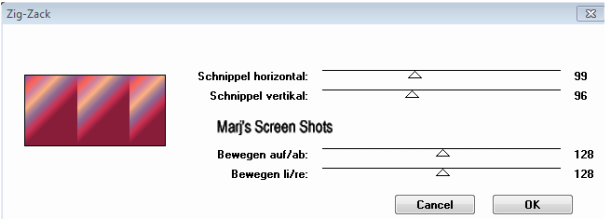
Filter Kiwi's Oelfilter Zig-Zack
Filter Eye Candy 2 Gradient Glow
Tube of choice- I used I new Artist for me Very Many, you get get the work here http://verymanytubes.com/
Drop Shadow I used was H & V 4 Opacity 40 Blur 5
Font of choice I used Aquarelle
Animation of choice
Gradient made with two colours from your tube Liner, Angle 0 Repeats 0,
or one that looks good with it I had this one, that I had download from a site here
http://www.nansons-place.com/index.html
Lets begin
Remember to save often
Step 1.
Image 600 x 300 fill with your gradient,
and apply, Kiwi's Oelfilter Zig-Zack, with the settings as shot 1
Effects Edge Effects, Enhance, duplicate and flip,
lower opacity down to 44, Merge visible, name this background
Shot1
is purely coincidental.
Please do not copy, and use as your own work.
if you wish to translate please email me
It’s assumed that you have working knowledge on how to use filters/plugins.
This tutorial is written using PSP 9 but it can also be done in other versions
Animation of choice, sorry I can not share but there are loads out there you can use
Filter Kiwi's Oelfilter Zig-Zack
Filter Eye Candy 2 Gradient Glow
Tube of choice- I used I new Artist for me Very Many, you get get the work here http://verymanytubes.com/
Drop Shadow I used was H & V 4 Opacity 40 Blur 5
Font of choice I used Aquarelle
Animation of choice
Gradient made with two colours from your tube Liner, Angle 0 Repeats 0,
or one that looks good with it I had this one, that I had download from a site here
http://www.nansons-place.com/index.html
Lets begin
Remember to save often
Step 1.
Image 600 x 300 fill with your gradient,
and apply, Kiwi's Oelfilter Zig-Zack, with the settings as shot 1
Effects Edge Effects, Enhance, duplicate and flip,
lower opacity down to 44, Merge visible, name this background
Shot1
Step 2
Copy and paste your tube re-size if necessary,
adjust, Sharpen and give it a drop shadow.
Step 3
Active your back ground layer and move to the top of your image,
Select all, Modify by 8, hit delete and select none,
apply Eye Candy 2 Gradient Glow, Glow width 5 Soft corners 25 Opacity 100,
Colour Rainbow.
Shift D this is for your AV, put this image to one side
Step 4
Add your name and copyright on the name.
I again applied Eye Candy 2 Gradient Glow,
save at this point if you do not wish to animated your tag
Step 5
Open up AS and find the animation you are going to use,
copy your background, close the rest of layers off,
and take the background layer to AS paste as a new image,
and make the same number of frames as your animation has,
the one I used had 57, then Edit Select All, Propagate,
do the same with your animation and paste this into your new image.
Step 6
Close of the background layer and open up the layers you had closed,
copy merge and take to AS, paste as a new image,
and make the same number of frames as the image you had just made,
when happy save as a GIF.
Step 6
Back to PSP open up the image you put to one side,
and crop this by150 X 150, using the part of image you want,
add your name and copyright, repeat step 5, and 6
as the animation was big I Edit Select all,
animation and re-sized it 150 X150.
when happy save as a GIF
PLEASE remember if you use any part of your tube to add your copywrite
Hope you enjoy my tutorial,
and problems please feel free to email me at [email protected]
please remember this is just a guide,
I would love to see any work you have made using my tutorials
And with your permission show them on my site
Marj
Written 6th December 2013
