St Pats

This tutorial is my own creation and any resemblence to any other tutorial, is purely conicidental.
This tutorial is written using PSP 9 but it can also be done in other versions.
Please do not copy or use as your own work
What we will need for this tutorial:-
Paint Shop Pro (PSP) any version mine was done in PSP9
Animation Shop
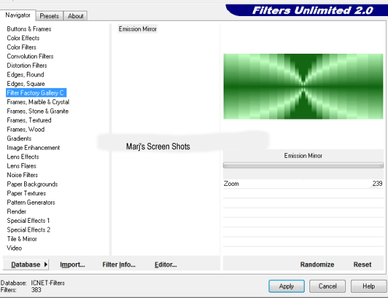
Filter Unlimited 20 Factory C Emmison Mirror
Filter Eye Candy Impact Glass
Tube of choice-Elias Chatzoudis
Please do not use unless you have a license you can find his great tubes at
PSP Tubes Emporium http://psptubesemporium.com/index.php?p=home
Font of choice I used Baby Pirate
Remember to save as you go along
Lets get started
Step 1
Open a image 80x80 image, make a coin by using your preset tool Elipse, foregound nil, background gold gradient,
make a small circle, Objects, Align, center, deselect none, shot 1
This tutorial is written using PSP 9 but it can also be done in other versions.
Please do not copy or use as your own work
What we will need for this tutorial:-
Paint Shop Pro (PSP) any version mine was done in PSP9
Animation Shop
Filter Unlimited 20 Factory C Emmison Mirror
Filter Eye Candy Impact Glass
Tube of choice-Elias Chatzoudis
Please do not use unless you have a license you can find his great tubes at
PSP Tubes Emporium http://psptubesemporium.com/index.php?p=home
Font of choice I used Baby Pirate
Remember to save as you go along
Lets get started
Step 1
Open a image 80x80 image, make a coin by using your preset tool Elipse, foregound nil, background gold gradient,
make a small circle, Objects, Align, center, deselect none, shot 1
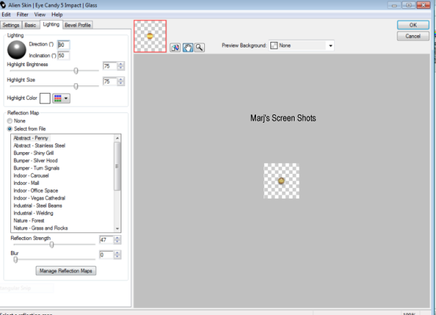
Convert to raster layer apply Eye Candy Impact Glass, now duplicating the coin, and move them to make a pile,
when your happy with your pile hide one coin and mege visible, put to one side, we will come back to this
Step 2
Open a new image 600 x 250
Fill with your gradient made with two colours from your tube Angle and Repeats 0 and invert ticked
Duplicate working on the duplicate apply Unlimited Factory C Emmison Shot 2
Effects Edge, Enhance still working on this layer appy Screen, merge visble
Step 3
Copy and paste your tube move it to the left, give it a burry drop shadow I used V& H 5 Opacity 100 Blur 5
Step 4
Open your coin pile you made earlier, and copy and paste on to your tag
see my tag, now copy the single coin, and rename coin 1, place just blow the rim on pot,
if you use same tube as me, dupicate for a total of 7 or 8 depending how big you made your coin,
now move them down one by one till the last one is on top of the pile hide all but original,
you want them to look as if they are spilling out of the pot.
Step 5
New Raster Layer fill with the dark colour from your tube,
Select all Modily by 4, hit delete, select none, add a the same drop shadow.
Add your copyright, name and a saying
Step 6 AV
Shift & D to duplicate delete your frame, tube, crop the part you want for your AV,
Remember if you use any part of your tube, to add your copyright
Step 7
Open up AS, with your first coin layer unhiden, copy merged, take over to AS, paste as new animation,
back to PSP hide this layer and open coin two, copy merged take to AS and paste affter current frame,
continue do this till you have taken all your coin layers across to AS,
if you use same size coin as me you will have a total of eight frames,
Edit, select all, frames properties 25.
Hope you enjoy my tututroial
Marj
Written by Marj 12th March 2012
