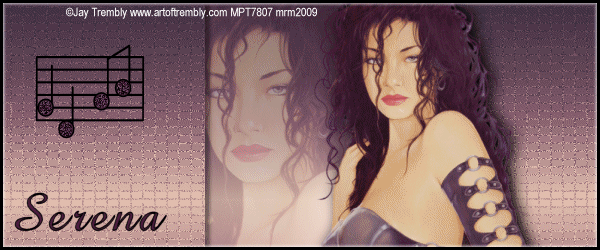
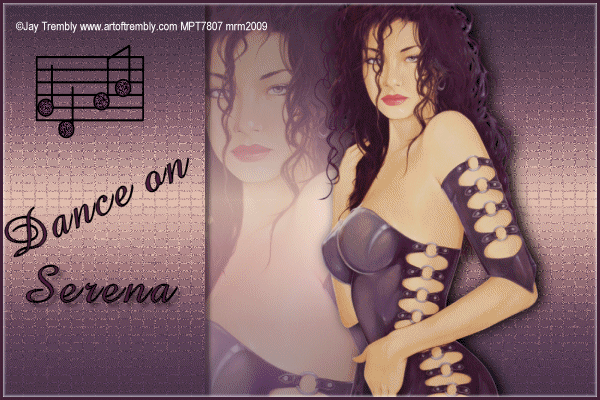
Dance on

his tutorial is written using PSP 9 but it can also be done in other versions. This tutorial is my own creation and any resemblence to any other tutorial, is purely conicidental.
Please do not copy and use as your own
What we will need for this tutorial:-
Paint Shop Pro (PSP) any
Tversion mine was done in PSP9
Filter MuRa's Meister Copies
Filter Graphics Plus Cross Shadow
Filter Eye Candy 400 Gradient Glow
Tube of choice- Jay Trembly I brought mine when he was at MPT
Please do not use unless you have a license you can find his work at http://www.scrapsandthecity.com/
Font of choice
Remember to save as you go along
This is the first time that I have done a set like this, and we are going to make the main tag first, and will use this for the forum and AV tags
Lets get started, make a graident with two colours from your tube liner Angel and Repeats 0
Step 1
Open a new image 600 x 400
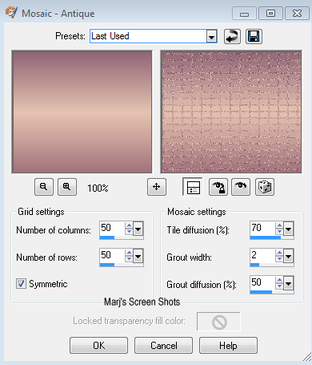
Fill with your graident, duplicate working on the duplicate layer go to Effects texture Mosaic Antique. Enhance Edges
Shot 1
Please do not copy and use as your own
What we will need for this tutorial:-
Paint Shop Pro (PSP) any
Tversion mine was done in PSP9
Filter MuRa's Meister Copies
Filter Graphics Plus Cross Shadow
Filter Eye Candy 400 Gradient Glow
Tube of choice- Jay Trembly I brought mine when he was at MPT
Please do not use unless you have a license you can find his work at http://www.scrapsandthecity.com/
Font of choice
Remember to save as you go along
This is the first time that I have done a set like this, and we are going to make the main tag first, and will use this for the forum and AV tags
Lets get started, make a graident with two colours from your tube liner Angel and Repeats 0
Step 1
Open a new image 600 x 400
Fill with your graident, duplicate working on the duplicate layer go to Effects texture Mosaic Antique. Enhance Edges
Shot 1
Step 2
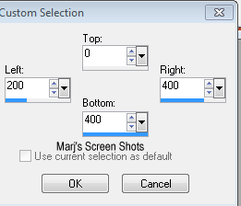
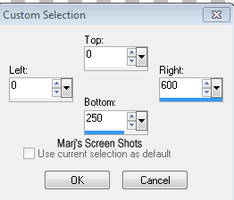
Take your Selection tool and make a selection, as shot 2 hit delete
Take your Selection tool and make a selection, as shot 2 hit delete
Deselect do a drop shadow, I used H & V at 5 opacity 100 Blur 5 then apply Drop Shadow again but H & V at -5 as this will give you a shadow of both sides,Step 3
Make your botton layer active, copy and add your close up of tube move to middle of screen,
resize if needed , apply screen, lower opacity down to about 60
Step 4
Still with your bottom layer active,,apply Graphics Cross Shadow moving Intensity and Brightness down to 50 duplicate this layer on dupicated layer mirror, and hide this for now
Step 5
Add your tube crop your tag at this stage give yout tube the same drop shadow as before, but only the once, now make your two tags to use for your forum set and AV by shift and D,
put these aside for now
Step 6
New raster layer flood fill with the dark colour and Sections All, Modify, Contact by 3 pixles ok hit delete secet none, appy Gradient Glow, Glow width 3 Soft Corners 25 and Overall Opacity 100, Color Thin white.
Step 7
Add your copyright and name, I also added a saying and a Embelshment.
I made one from a preset shape.
Step 8
Open up one of the images you put to one side do a section, move your tube to hwere you want it
then Image crop to Section
Shot 3
Deselect and repeat step 6
Step 9
Crop the piece of tag you want to use 150 x 150 pixel and repeat step 6, remember if you use any of the tube to add the Artist copyright
Step 10
Open up AS make sure you have the duplicate copy of Cross shadow hidden,
copy merged and take over to AS,
Back to PSP hide the bottom layer unhide the dupilcate layer and take to AS,
paste after current frame, select all frame properties 40,
repeat these steps for your forum tag
The 2nd set I made I used the wonderful art work of Ismael Rac you can get his work here http://xeracx.net/store/
Hope you enjoy my tut.
Marj


Written by Marj 23rd March 2012
