I BURN for you
This tutorial is my own creation and any resemblance to any other tutorial, is purely coincidental.
Please do not copy and use as your own work
This tutorial is written using PSP 9 but it can also be done in other versions
Animation Shop I will refer to this as AS
Filter MuRa's Copies
Tube of choice- I using Anthony Guerra one that has a close up if possible
I brought mine when he was with CILM
Anthony is no longer selling Tubes anywhere.
This was posted on Anthony's FB page before it closed:
Just credit the tags with ©Anthony Guerra and don't worry about the link.
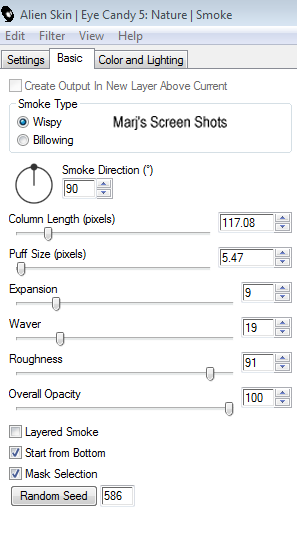
Filter Eye Candy Nature Smoke
Drop Shadow I used was H & V 3 Opacity 50 Blur 5
Font of choice I used A LoLita Scorned
Lets begin
Remember to save often
Step 1.
Open a image 600 x 400 fill with a light colour from your tube,
I used #dec1b1 name this background,
copy and paste your tube resize if it needs it,apply MuRa's Copies Wallpaper Rotate
I did 26, play around with the numbers as you want it to cover the image,
still on the tube layer, rename this Fur, Adjust Gaussian Blur Radius 10,
still on this level, Effects Texture Fur, Blur 43 Density 40 Length 50 and Transparency 100, click ok,
shift D twice, put to one side for now
Step 2
Active the Fur layer, Apply AAA Foto Frame, Width 12
leave the rest alone but use Gray RGB 70-70-70.
still with this layer active Image resize all layers unticked size by 90%,
now active your background layer,
Adjust Add noise Uniform Monochrome ticked and Noise at 60, click ok
Step 3
Add your copyright name and saying at this point,
copy and paste your tube,
if you use the same tube as me there are a few layers so chose the one you like,
Apply Eye Candy Nature Smoke Text 100pt Trailing shot 1
Please do not copy and use as your own work
This tutorial is written using PSP 9 but it can also be done in other versions
Animation Shop I will refer to this as AS
Filter MuRa's Copies
Tube of choice- I using Anthony Guerra one that has a close up if possible
I brought mine when he was with CILM
Anthony is no longer selling Tubes anywhere.
This was posted on Anthony's FB page before it closed:
Just credit the tags with ©Anthony Guerra and don't worry about the link.
Filter Eye Candy Nature Smoke
Drop Shadow I used was H & V 3 Opacity 50 Blur 5
Font of choice I used A LoLita Scorned
Lets begin
Remember to save often
Step 1.
Open a image 600 x 400 fill with a light colour from your tube,
I used #dec1b1 name this background,
copy and paste your tube resize if it needs it,apply MuRa's Copies Wallpaper Rotate
I did 26, play around with the numbers as you want it to cover the image,
still on the tube layer, rename this Fur, Adjust Gaussian Blur Radius 10,
still on this level, Effects Texture Fur, Blur 43 Density 40 Length 50 and Transparency 100, click ok,
shift D twice, put to one side for now
Step 2
Active the Fur layer, Apply AAA Foto Frame, Width 12
leave the rest alone but use Gray RGB 70-70-70.
still with this layer active Image resize all layers unticked size by 90%,
now active your background layer,
Adjust Add noise Uniform Monochrome ticked and Noise at 60, click ok
Step 3
Add your copyright name and saying at this point,
copy and paste your tube,
if you use the same tube as me there are a few layers so chose the one you like,
Apply Eye Candy Nature Smoke Text 100pt Trailing shot 1
Step 4
Open up AS and copy merge and take over to AS.
Paste as new image, back to PSP, undo the smoke reapply hitting the random button
and repeat the above step,
repeat again and view animation if happy save as GIF,
I set my frames at 30.
Step 5
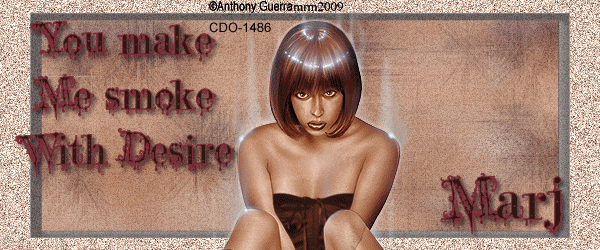
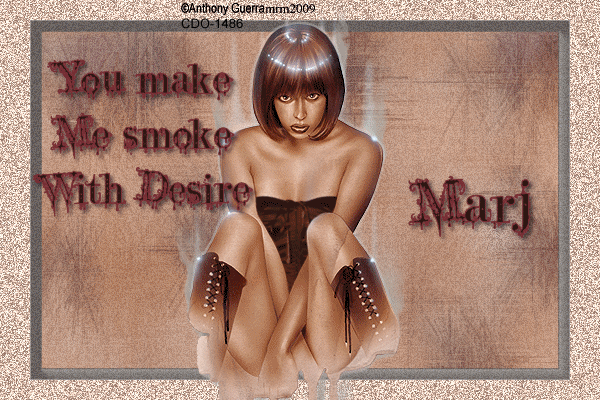
Back to PSP, now open up one of the images you set to one side and crop it by 600 X250
and repeat Steps 2, 3 and 4. again save as a GIF,
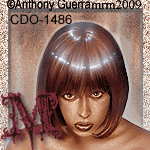
open up the other image and crop it by 150 x 150.and repeat Steps 2, 3, and 4
Please remember to add your copyright on the forum and the AV tags
Hope you enjoy my tutorial and if you have any questions please feel free to email me at [email protected]
Marj
Written 30th April 2013
Open up AS and copy merge and take over to AS.
Paste as new image, back to PSP, undo the smoke reapply hitting the random button
and repeat the above step,
repeat again and view animation if happy save as GIF,
I set my frames at 30.
Step 5
Back to PSP, now open up one of the images you set to one side and crop it by 600 X250
and repeat Steps 2, 3 and 4. again save as a GIF,
open up the other image and crop it by 150 x 150.and repeat Steps 2, 3, and 4
Please remember to add your copyright on the forum and the AV tags
Hope you enjoy my tutorial and if you have any questions please feel free to email me at [email protected]
Marj
Written 30th April 2013
